Vision Statement:
To be a reliable and compassionate first aid team dedicated to protecting lives and promoting health in our local and rural communities.
Mission Statement:
To deliver timely, skilled, and compassionate first aid services during emergencies, training, and community outreach—especially in underserved rural areas.
We aim to:
Support LGV with professional first aid during operations and training.
Extend life-saving care and health education to rural populations.
Enhance community resilience through awareness, preparedness, and hands-on assistance.
Continuously improve our readiness through ongoing training and collaboration.
Provide Risk Based Primary Emergency Care / First Aid in the Workplace

SAQA Unit Standard: 120496
H. Chamberlain – F01/585/ASR003667
Module Topic
Section 1 The legal aspect of applying FIRST AID and FIRST AID scene Management
Section 2 Anatomy and Physiology.
Section 3 Cardio Pulmonary Resuscitation and Choking.
Section 4 Bleeding, wounds and burns.
Section 5 Head, spinal, chest, abdominal, pelvic and fracture injuries.
Section 6 Environmental emergencies, near drowning, bites & stings
and poisoning.
Section 7 First aid treatment procedures for medical emergencies and
shock management.
Section 8 Triage, record keeping and emergency carry methods.
Attachment A – The complete patient simulation.
Attachment B – Legal required content of a first aid box.
SECTION 1: The legal aspect of applying FIRST AID and FIRST AID scene Management
1. INTRODUCTION TO FIRST AID.
As emergency care professionals, we encourage everyone to attend a first aid course or to be familiar with, and able to, render basic first aid skills and treatment. In South Africa and most other countries, access to emergency services resources (paramedics and ambulances) is limited and/or stretched. Often, injured victims or patients have to wait a very long time for professional emergency care assistance.
First aid and cardiopulmonary resuscitation (CPR) emergency care treatment is a lifesaving skill that has a positive impact on patients who are seriously ill, injured, or in cardiac arrest. We encourage you to keep yourself current and familiar with the knowledge and skills gained on this course and to offer your assistance and skills to all patients who might need your help. First aid and CPR does make a difference and saves lives!
In South Africa, the Occupational Health and Safety (OHS) Act 85 of 1993 dictates and regulates the working environment for all employers and employees and to ensure a safe and incident free work environment.
2. THE PRINCIPLES OF FIRST AID.
First aid should be administrated as soon as possible. The commonly accepted ‘principles of first aid’ are to:
- Preserve life by keeping the patient alive.
- Prevent further injury or the illness from worsening.
- Promote healing through on-going first aid or medical care.
3. THE LEGAL ASPECTS AND ETHICS OF FIRST AID.
While there is no actual legal obligation for one individual to render first aid to another individual, most people believe that helping others is a moral obligation. However, if you have an employment obligation such as a signed letter of appointment, or if assisting others is an employment requirement, you are required to assist and/or may have a legal duty to act.
If there is the concern of legal action being taken against a person rendering first aid, Whilst South Africa has no formal “’Good Samaritan Law’ as in North America, any first aider has a moral obligation to act and a court of law will always apply the reasonable man test should legal action arise.
PATIENT CONSENT
CONSENT
Any person has the legal right to refuse first aid or medical care and their right of refusal must be respected. It is therefore important to obtain consent from a patient to assist them and to proceed with first aid treatment.
IMPLIED OR SILENT CONSENT.
If a patient is unconscious, you may assume that they would have given consent if they were conscious and therefore you may proceed with treatment.
MINORS.
Only the parents or guardians of a minor may refuse first aid treatment on behalf of the minor. If the parents or guardian are not present, you can assume that they would have given their consent to proceed with treatment.
ABANDONMENT.
If you begin treating a patient during an emergency, you have a legal obligation to continue treating that patient until you are able to hand the patient over to someone else of the same or of a higher first aid or medical certification. If you stop treatment, or leave the patient before handing the patient over to someone who has either the same or a higher certification, you have abandoned the patient and may be accused of abandonment which holds legal implications.
4. SCENE SAFETY, HAZARDS, AND DISEASE PREVENTION
On arrival at a first aid and emergency scene, there is often chaos and confusion and it is critically important to first perform a ‘scene size up’. Make sure that there are no hazards to yourself and that you are safe. If you do not assess the scene safety and recognise potential hazards, you may end up being seriously injured yourself.
An immediate reaction is to rush in and save the patient, but the patient is actually last in the list of safety priorities:
- Safety to yourself;
- Safety to the scene;
- Safety to the bystanders;
- Safety to the patient.

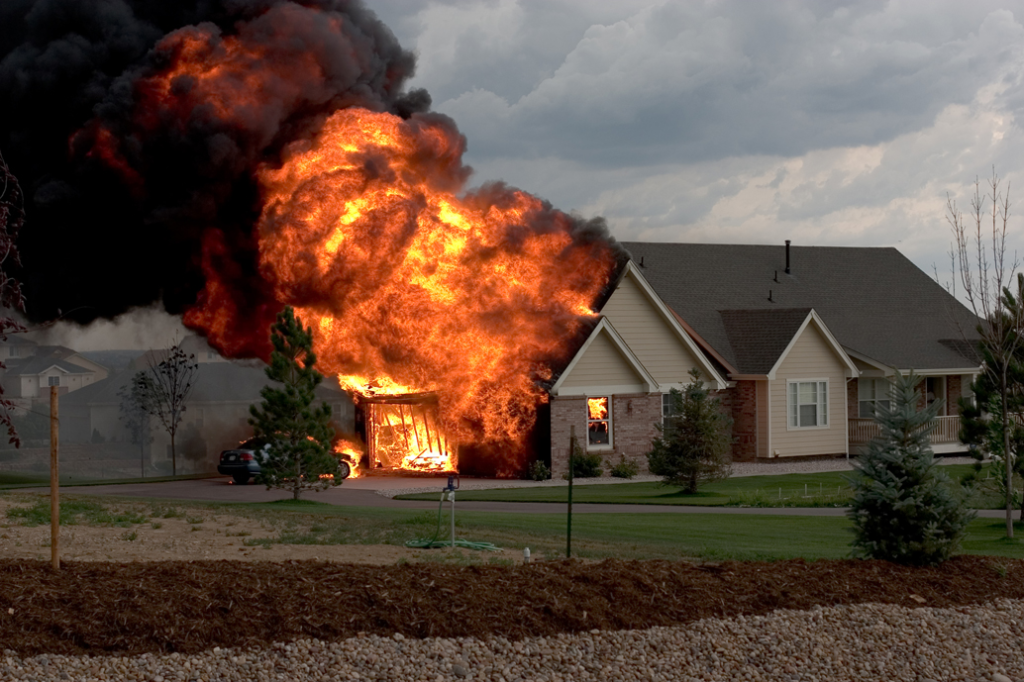
Car under a truck (CNN. 2016). House on fire (Reconstruction 380. 2018)
SAFETY TO YOURSELF
Your life is important and it is not worth rushing into an emergency scene and ending up injured or dead, because you did not ensure safety to yourself first. Make sure that there are no immediate or hidden dangers on the scene.
If it is not safe for you to assist, you must wait for additional assistance to arrive and only once it is safe, proceed to offer your assistance.
Another aspect of safety to yourself is protection against disease transmission. Bodily fluids such as blood and saliva may carry disease-transmitting germs. Standard precautions such as wearing protective latex gloves, facemasks, glasses, and mouth-to-mouth barrier devices are important. This equipment is known as Personal Protection Equipment (PPE).
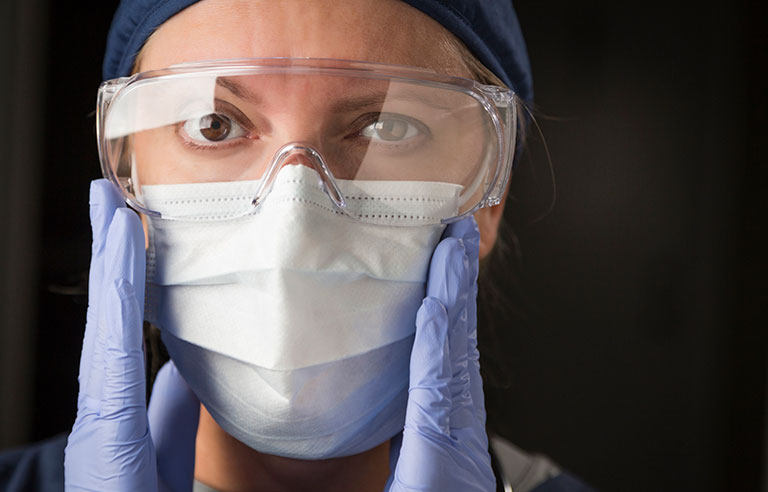
Always remember to wear your PPE (Safety + Health. 2017)
It is advisable to wash your hands before (if possible) and after rendering first aid treatment. Using warm running water and soap, rub all of your hand surfaces together for 15 seconds, then rinse off the soap with water, and dry your hands with a clean towel.

8 Steps of hand hygiene (HealthHub. 2018)
SAFETY TO THE SCENE
Perform a thorough scene size up and make sure that the scene is safe for everyone. As a first aider, you are often the first person on scene, with the emergency services still en route. It is therefore your responsibility to perform scene safety. Safety to yourself and safety to the scene are generally covered simultaneously.
SAFETY TO THE BYSTANDERS
Bystanders have a natural curiosity that attracts them towards accidents, as people have a natural instinct to see what’s going on and to try help where they can. Unfortunately, many bystanders don’t realise that they may be placing themselves in danger, and are unaware of the hazards surrounding them. As the first aider and highest medically certified person on scene, it is necessary to inform bystanders of hazards and to try moving them to points of safety without delay.
SAFETY TO THE PATIENT
Only once you have considered safety to yourself, the scene, and the bystanders, do you consider safety to the patient. You might have to perform an emergency extrication and pull a patient away from a burning vehicle, or remove them from a dangerous scene or scenario.
MECHANISM OF INJURY AND DETERMINING WHAT’S WRONG.
Upon arriving at any emergency scene, it is important to view the entire scene to see what actually happened. In addition, look for items such as medical alert bracelets, medicine containers, fallen ladders, and electrical wires. Look at the positioning of the injured person and look for obvious visible injuries.
All of these factors will enable you to suspect and understand certain injuries. This analytical process is called ‘mechanism of injury’, or MOI.
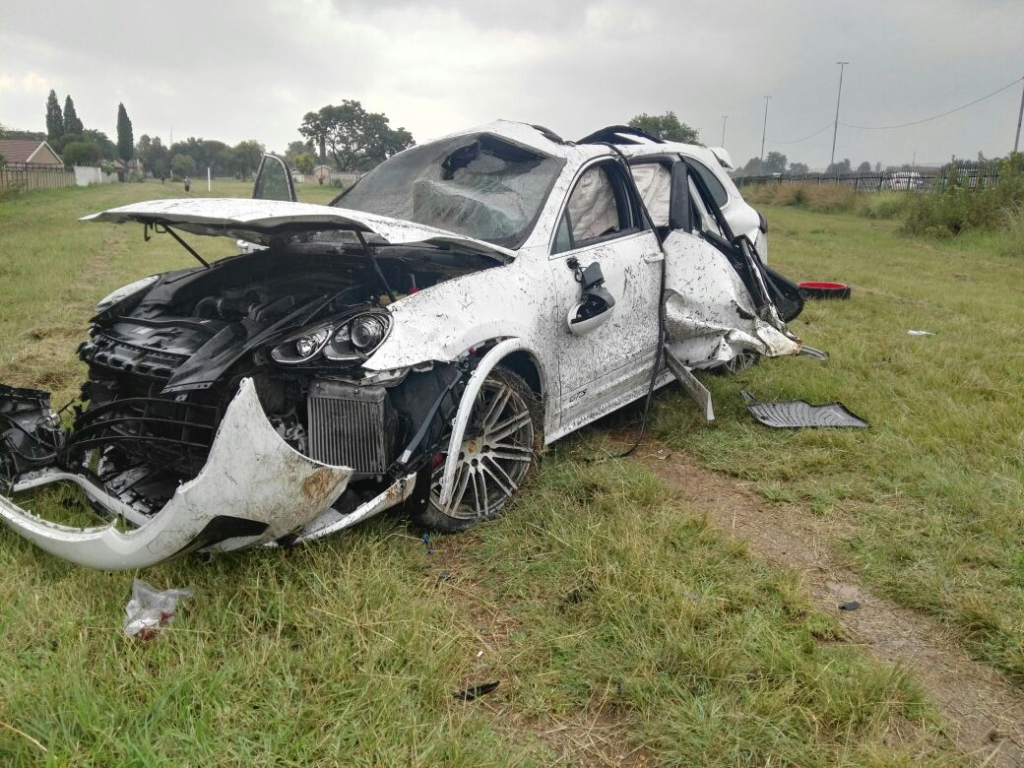
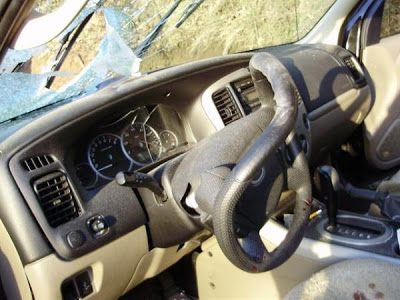
By looking at the damage of the vehicles in an MVA you can get an idea of possible injuries a patient might have sustained (Alberton Record, 2018) (Dangerous Trailers, 2010)
DETERMINING WHAT’S WRONG
Determining what’s wrong with a patient assists in reducing panic, forms a trusting relationship with the patient and ensures prompt, targeted, and appropriate first aid.
Treat the cause of the emergency or illness or ‘find it and fix it’
Ask the patient what their chief complaint is by asking, “What is wrong?”
If you are assessing a patient and find a significant injury, stop and focus on treating that injury. Patients with medical illnesses often wear medical alert bracelets, necklaces or have tattoos, which will also assist you in identifying the possible cause of the illness or problem.


Medical Alert Bracelets and tattoo (Handy Made By Heroes, 2018) (Amazon, 2018) (Pinterest. ND)
THE PRIMARY SURVEY
The primary survey has an important and critical goal, which is to identify and immediately treat life-threatening issues. Priority must be given to determining the patient’s LOC (level of consciousness) and CAB (circulation, airway, and breathing).
PRIMARY SURVEY PROCEDURE
Follow the H H H C A B D acronym.
Hazards: Safety first: ensure there are no hazards on the scene.
Hello: Establish if the patient is awake and responding in any way.
Help: Send someone to call the emergency services for assistance and, if you are starting CPR, to bring back an AED if available.
Circulation: If there are no signs of life, no movement, and no visible breathing, start CPR/chest compressions immediately (30 compressions).
Airway: If the patient is talking to you, the airway is assumed to be open and free of obstructions. If they are not responding, open the mouth and open the airway by performing the head-tilt/chin-lift manoeuvre (if no spinal injuries suspected)
Breathing: Is the patient breathing? If not, administer two breaths by performing mouth-to-mouth using a safety device or ‘pocket mask’.
Don’t delay: Stop any life-threatening bleeding and treat any other obvious injuries.
HAZARDS
As discussed in module 1, ensure that the scene is safe and that the surroundings are free of any hazards that could endanger yourself, bystanders, or the patient. Remember:
- Safety to yourself;
- Safety to the scene;
- Safety to the bystanders;
- Safety to the patient.
HELLO
Is the patient awake?
As you approach the patient, obtain a visual general impression of the patient. Determine whether the patient sees you approaching, is talking, or is lying still and not moving.
Talk to the patient and see if and how they respond. Say, “Hello, I’m a first aider and I’m here to help you.” While you are saying hello, tap them firmly on the shoulder to see if they are awake and whether they respond or not. You are determining if the patient is awake and breathing. Normally, you will receive a response from the patient and/or notice if they are breathing. If you don’t get a response and don’t notice any chest or abdomen breathing movements, call someone to help you.
HELP
Call someone to help and assist you. They could be a work colleague or a bystander. Get them to contact and activate the emergency services and tell them that you are starting treatment or CPR. Ask them to bring back an AED (automated external defibrillator) if required. They must come back to you so that you can confirm with them that the medical assistance is on their way.
Try to remember these National Emergency Numbers and store them on your mobile phone:
- Government emergency services: 10177 or 112
- Netcare911: 082 911
- ER24: 084124
- Emer-G-Med: 0861007911
- South African Police Service: 10111
You will most likely be asked to supply the following details when making an emergency call:
- Your name;
- Your contact telephone number;
- Emergency location (be specific and give them the nearest visible landmarks);
- Nature of incident (i.e. patient is not responding, starting CPR);
- Suspected injuries (i.e. heart attack or other);
- Other services that might be required (i.e. police in the case of an accident or crime, fire brigade, Jaws of Life, etc.)
CIRCULATION
Awake: If the patient is breathing, responding, and/or awake, then the patient has a pulse/circulation and you don’t have to perform CPR or chest compressions.
Not responding: If the patient is not awake and there is no breathing or movement, start chest compressions and CPR immediately. 30 compressions (hard and fast), followed by opening the airway and delivering 2 breaths. Continue for five cycles of 30:2, which should be approximately two minutes for CPR, then break for no longer that 10 seconds to see if there is any return of breathing or movement, and to check whether the emergency services have arrived.
AIRWAY
Awake: If a patient is conscious and talking to you, their airway is O.K. and not immediately threatened or jeopardised.
Not responding: If the patient is not responding and unconscious, open the mouth, look into the mouth, and check that there is no obstruction visible. If an object is visible and you can safely remove, do so. DO NOT BLINDLY DIG IN An UNRESPONSIVE PERSONS MOUTH. Then use the ‘head-tilt/chin-lift’ or the ‘jaw-thrust’ (used if there is a suspected neck injury) method to open the airway. Once the airway is opened, it must be kept open by the head-tilt/chin-lift method, or the patient must be placed into the lateral recovery position, which will keep the airway opened naturally.
Head-tilt/chin-lift method
Place the fingers of your one hand on the patient’s forehead and tilt the head backwards;
With the thumb and two fingers of the other hand, take hold of the point of the patient’s chin;
Lift the chin and open the mouth simultaneously.
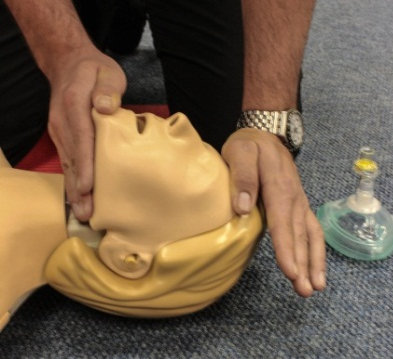
Head-tilt/chin-lift (Photo courtesy of Absolute Health Services)
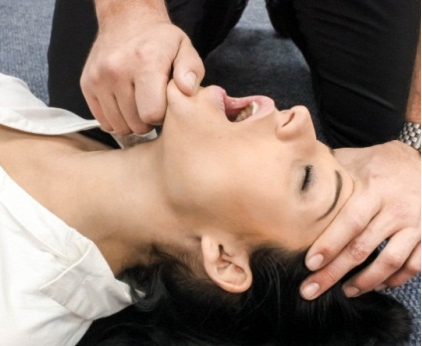
Jaw-thrust method
Using the palms of your hands to stabilise the head, place your fingers behind the angle of the jaw and move the jaw forward, which will then open the patient’s airway.

A Jaw-thrust (Photos courtesy of Absolute Health Services
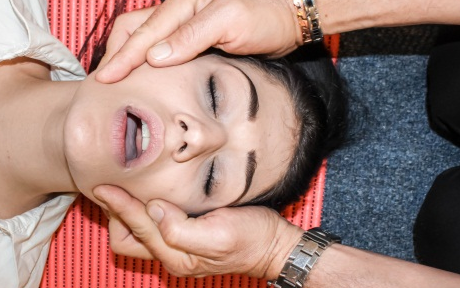
Lateral recovery position
Placing an unconscious patient in the lateral recovery position will ensure that their airway remains open, without having to perform and maintain the head-tilt/chin-lift manoeuver.
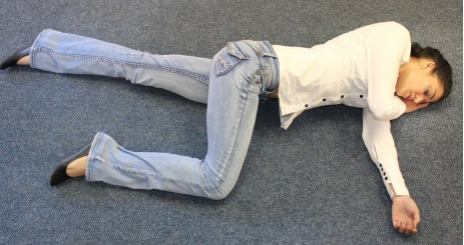

The recovery position (Photos courtesy of Absolute Health Services)
BREATHING
Awake: If the patient is awake and responding to you, they will be breathing.
Not responding: If there is no breathing, deliver two breaths with the mouth-to-mouth or mouth-to-mask technique (referred to as Rescue Breathing)
Rescue Breathing:
If the patient has a pulse but is not breathing adequately or at all, you will need to assist them with breathing. This is called Rescue Breathing. Remember to ensure safety to yourself by using a one-way valve face shield or a pocket mask when providing rescue breathing.
To perform rescue breathing:
Open the patient’s airway using one of the airway opening methods
Place the one-way valve face shield or pocket mask over the patients nose and mouth, ensuring a good seal is made to prevent any air escaping.
Give a breath. Watch for chest rise.
Give each breath over a second. Aiming for a rate of:
- Adults: 1 breath every 6 seconds
- Children: 1 breath every 5 seconds
- Infants: 1 breath every 4 seconds
DON’T DELAY
If there is any visible serious bleeding, you must attempt to stop the bleeding now. Or if there are any other obvious serious injuries, treat those now as well.
The primary survey is now complete. You may now proceed to the secondary survey which is more thorough and detailed assessment of the patient.
SECONDARY SURVEY
The secondary survey is a more lengthy and detailed assessment. It is a systematic process used to determine the patient’s overall medical condition and to locate all their injuries.
SECONDARY SURVEY PROCEDURE
The secondary survey is carried out by assessing three treatment categories:
Vital signs
SAMPLE history
Head-to-toe examination
VITAL SIGNS
Vital signs are the key signs that are used to evaluate a patient’s overall condition.
These include:
Pulse
Respiration
Level of Consciousness (LOC)
Pupil reaction
Skin colour and condition.
These signs must be taken at least every 10 minutes to determine if the patient’s condition is improving or deteriorating.
PULSE
Pulse refers to the heart pumping blood through the body, which can be monitored by checking a person’s pulse rate.
Normal pulse rates:
![]() Adults: 60–80 beats per min;
Adults: 60–80 beats per min;
![]() Children: 80–100 beats per min;
Children: 80–100 beats per min;
![]() Babies: 100–120 beats per min.
Babies: 100–120 beats per min.
The pulse rate is calculated by counting how many pulse beats are felt in a minute. It is vital to have a watch or clock with a second hand or a stopwatch readily available to do this accurately.
There are several places on the body where a pulse can be found or felt, but we generally use the following:
- Carotid pulse. This pulse is situated in the neck. Place your three fingers next to the trachea in the groove between the trachea and the neck muscle.
- Radial pulse. This pulse is situated at a person’s wrist. Follow from the thumb towards the wrist on the inner arm.
- Brachial pulse. This pulse is situated between the muscles and the humerus bone of the inner upper arm. This pulse is mostly used with babies, as they do not have a neck and very small radial pulse.
- Pedal pulse. This pulse is situated on top of the foot. Palpitate from in between the large toe and the toe next to that, towards the top of the foot.


Various places to feel for a pulse (Photos courtesy of Absolute Health Services)
BREATHING
Breathing (also referred to as respirations) is also checked. It is important that the brain receives a continuous supply of oxygen and this is achieved by adequate breathing.
Normal breathing rates are as follows:
![]() Adults: 12-20 breaths per min;
Adults: 12-20 breaths per min;
![]() Children: 20-30 breaths per min;
Children: 20-30 breaths per min;
![]() Babies: 30-60 breaths per min.
Babies: 30-60 breaths per min.
The breathing rate is calculated by feeling and looking at the chest rise for each breath for 30 seconds, and then multiplying that number by two to determine the number of breaths in a minute/60 seconds.
Remember, there is a rise and a fall in the chest wall for each breath (i.e. one breath).
LEVEL OF CONSCIOUSNESS (LOC)
The ‘AVPU scale’ is used to determine the LOC of a patient during patient assessment and treatment.
Alert: Able to answer questions such as, ‘What’s your name?’, ‘Where are you?’, or ‘What year is it?’ If the patient can respond in a normal manner then A for Alert is achieved.
Verbal: Responds to verbal commands. The patient is not alert, but responds to verbal commands such as being asked to squeeze your hand. If the patient responds to your verbal command then V for Verbal is achieved.
Pain: Responds to painful stimulus. The patient responds to painful stimulus such as pressing on the nail bed or performing the sternum rub (rubbing the sternum with your knuckles). Monitor the patient’s facial expressions for any reaction. If the patient responds to painful stimulus then P for Pain is achieved.
Unresponsive: No response. The patient does not respond to any of the above tests.
PUPIL REACTION
Pupil reaction is a response that varies the size of the pupil. A ‘constriction response’ is the narrowing of the pupil, which may be caused by drugs such as opiates and opioids, or other medications.
A ‘dilation response’ is the widening of the pupil, and may also be caused by drugs such cocaine, amphetamines, and some hallucinogens.
Unequal pupils could indicate an internal brain injury. When associated with a wound to the head, a serious head and brain injury is possible.
Fixed (i.e. don’t respond to light) and dilated pupils are also an indication of brain death. After approximately six minutes of no breathing and no oxygen to the brain, the pupils become fixed and dilated, which is a sign of a poor outcome.

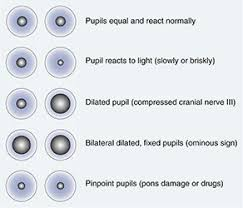
Various things may cause pupils to act abnormally (All About Vision, 2017) (Perrla Eyes, 2017)
SKIN
The skin provides an easy indication of any indication of the patient’s circulation and perfusion, blood oxygen levels, and body temperature.
These skin indications may also be good initial indicators of heat or cold injuries. This initial indicator should always be confirmed, when time permits, with a core body temperature by using a thermometer.
– Skin colour
Many blood vessels lie near the surface of the skin. Poor peripheral circulation (classically when a patient is in shock) will cause the skin to appear pale, white, ashen, grey, or waxy and translucent like a white candle. These skin colours can also appear in abnormally cold or frozen skin.
When the blood is not properly saturated with oxygen, it changes to a bluish colour. Skin over the blood vessels appears blue or grey, a condition called cyanosis.
– Skin temperature
Normally, the skin is warm to the touch. The skin can feel hot with significant fever, sunburn, or hyperthermia (high temperature) and the skin can feel cool in early shock, with profuse sweating, heat exhaustion, and severe hypothermia (low temperature) and/or frostbite.
Feel the patient’s forehead with the back of your un-gloved hand to determine a fever or skin temperature.
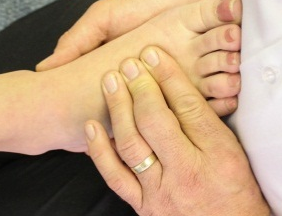
– Capillary refill
Capillary refill can be a good skin circulation indicator. Capillary refill is used to evaluate the ability of the circulatory system to restore blood to the capillary system (called perfusion)
Capillary refill is a simple test of perfusion to the extremities, and is evaluated at the nail bed in a finger:
Place your thumb on the patient’s fingernail and gently compress;
Pressure forces blood from the capillaries;
Release the pressure and observe the fingernail;
As the capillaries refill, the nail bed returns to its normal deep pink colour;
Capillary refill should be both prompt and pink, approximately two seconds.


Checking for capillary refill (Photos courtesy of Absolute Health Services)
SIGN VS SYMPTOM
Sign: A sign is a finding from a patient or the immediate surroundings that can be seen (vomiting), heard (screaming in pain), felt (bones rubbing together, or crepitus), smelled (faeces from severe shock), or measured (increased heart rate).
Symptom: A symptom is a finding that the patient feels and that can be identified only by the patient, such as chest pain, nausea, or headache.
SAMPLE HISTORY
‘SAMPLE’ is a mnemonic acronym used to remember key questions when completing the history taking of a person’ medical history.
It is best used when the person is fully conscious or alert, but often much of this information can also be obtained from the family or friend of an unresponsive person.
SAMPLE stands for:
- S – Signs and symptoms
- A – Allergies
- M – Medications
- P – Past illnesses
- L – Last oral intake
- E – Events leading up to present illness/injury
After obtaining all of the above information, the first aider is in a position to have a good overall understanding of the patient’s history and also what may have caused the patient’s current state or condition.
HEAD-TO-TOE EXAMINATION
The head-to-toe is a detailed examination where you should thoroughly look for hidden injuries and abnormalities, so that you don’t miss any hidden or underlying injuries.
Divide the body into six areas when assessing the patient:
Head and neck: The head and neck are important areas to assess, and you should take time and care to look for any potential problems.
- Head: Using both hands (with gloves on), gently run your hands across the skull, pressing in gently but firmly, starting at the forehead and working around to the back of the head. Feel for indentations, look for blood or fluid, and watch the victim for signs of discomfort. If it is a trauma injury, check both ears and nostrils for signs of blood or CSF (cerebral spinal fluid), which could indicate an internal head injury.
- Neck: The neck is an important area. Start at the sides of the neck and gently press in. Watch carefully for signs of pain. Move around until you reach the cervical spine area, moving as far down the neck as possible without moving the patient. If there is pain, tenderness or deformity here, stop the survey and immediately immobilise the neck, placing one hand on each side of the head, with the thumb around the ear.
Shoulders, chest, and back: This area of the body contains many of the vital organs, such as the heart and lungs, so it is important to look for abnormalities that could indicate internal/hidden injuries.
- Shoulders: Expose the shoulders if possible, and look for obvious deformity, especially around the collarbones. Try pressing along the line of the collarbone, feeling for deformity and watching for pain. Then, place a hand on each shoulder and gently push down, looking to ensure that one side does not move more than the other.
- Chest: The chest is best examined when exposed, (remain sensitive to females when/if exposing the chest. If you are able to keep breasts covered, it is advisable to do so.) You should be looking for sections of the chest that are out of line with the rest of it, or that are moving differently to the rest of the chest whilst breathing. You should also look for obvious wounds. You can then gently press on the chest. You are watching for one side moving differently to the other, or for any pain being caused.
- Back: If the patient is lying on their side or front, you can also feel down their spine for any deformities. Look for obvious wounds. If they are lying on their back, then skip this part of the check, and leave it for the ambulance crew.
Arms and hands: Run both of your hands down one arm at a time, looking for deformity, pain or wounds.
Abdomen: The abdomen contains the remainder of the body’s critical organs, such as the intestines, so it should be checked for potential damage. The abdomen is mostly examined by gentle pushing, using the flat of your hands. Again, check for symmetry, and push both sides simultaneously. Check if the abdomen feels hard (this is called ‘distended’) and watch for pain caused by the gentle pushing.
Pelvis: The pelvis (hips) is a large bone, with potential for a fair amount of damage. Look for any deformities and feel gently for any pain or tenderness. Do not try and move the patient or manipulate the pelvis as you may cause more harm to the patient.
Legs and feet: As with the arms, use both hands at the same time, running them down the inside and outside of each leg simultaneously (avoiding the groin area on the inside). Also look for any shortening or rotation of one leg compared to the other. Finally, take each foot, check that it has normal movement and no obvious injuries.
SECTION 2: ANATOMY AND PHYSIOLOGY.
THE RESPIRATORY SYSTEM
The Respiratory system or tract is divided into an upper section and a lower section.
The upper tract includes the nose, nasal cavities, sinuses, pharynx, and the part of the larynx above the vocal folds.
The lower tract includes the lower part of the larynx, the trachea, bronchi, bronchioles, and the alveoli. Gas exchange in the lungs occurs in millions of small air sacs called alveoli. These microscopic air sacs have a very rich blood supply, thus bringing the air into close contact with the blood, where gaseous exchange takes place.

The Respiratory System (ScienceNetLinks. 2018)
THE CARDIOVASCULAR SYSTEM
The cardiovascular system, also called the circulatory system or the vascular system, is a system that allows blood to circulate and transport nutrients, oxygen, carbon dioxide and hormones to and from cells in the body to provide nourishment and help in fighting diseases.
The essential components of the human cardiovascular system are the heart, blood, and vessels.
The pulmonary circulation is a ‘loop’ through the lungs where blood is oxygenated and the systemic circulation is a ‘loop’ through the rest of the body to provide the oxygenated blood to the body.
An average adult contains five to six litres of blood. Blood consists of plasma, red blood cells, white blood cells, and platelets. The digestive system also works with the circulatory system to provide the nutrients the system needs to keep the heart pumping.
The cardiovascular system is closed, meaning that the blood never leaves the network of blood vessels. In contrast, oxygen and nutrients diffuse across the blood vessel layers and enter interstitial fluid, which carries oxygen and nutrients to the target cells, and carbon dioxide and wastes in the opposite direction out of the body.

The Cardiovascular System (The Art of Health on Capital Hill, 2011)
THE SKELETAL SYSTEM
The human skeleton is the internal framework of the body. It is composed of around 270 bones at birth. This total decreases to around 206 bones by adulthood, after some bones fuse together.
The human skeleton performs six major functions, namely support, movement, protection, production of blood cells, storage of minerals, and endocrine regulation.

The Skeletal System (Encyclopaedia Britannica, 2018)
SECTION 3: CARDIO PULMONARY RESUSCITATION AND CHOKING.
CARDIOPULMONARY RESUSCITATION (CPR)
CPR is an emergency procedure that combines chest compressions with artificial breathing (ventilation) in an effort to manually circulate blood to the vital organs of the body, such as the heart and brain, when the heart cannot pump adequality, or at all by itself.
The main purpose of CPR is to restore partial flow of oxygenated blood to the brain and heart to delay tissue death and preserve brain function until professional help arrives.
CPR alone is unlikely to restart the heart. Administration of an electric shock to the patient’s heart, termed ‘defibrillation’, is usually needed in order to hopefully restore a heartbeat. CPR may succeed and assist in inducing and starting a heartbeat or rhythm that may be ‘shock-able’.
We therefore train CPR and automated external defibrillator (AED) training together as the survival chances and survival percentage increase drastically with the use of an AED during resuscitation attempts.
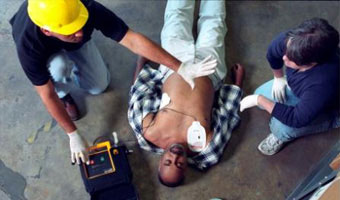
CPR in combination with an AED (Safety 1st, 2011)
Follow the primary survey procedure, explained previously, to identify and immediately treat life-threatening issues.
FOLLOW THE H H H C A B D ACRONYM:
Hazards: Safety first: ensure there are no hazards on the scene.
Hello: Establish if the patient is awake and responding in any way and whether they are breathing. Call someone to help you.
Help: Send someone to call the emergency services for assistance and, if you are starting CPR, to bring back an AED if available.
Circulation: If there are no signs of life, no movement, and no visible breathing, start CPR/chest compressions immediately (30 compressions).
Airway: If the patient is talking to you, the airway is open and free of obstructions. If they are not responding, open the mouth and open the airway by performing the head-tilt/chin-lift manoeuvre.
Breathing: Is the patient breathing? If not, administer two breaths by performing mouth-to-mouth using a safety device or ‘pocket mask’.
Don’t delay: Stop any life-threatening bleeding and treat any other obvious injuries. Call backup or the emergency services to assist you.
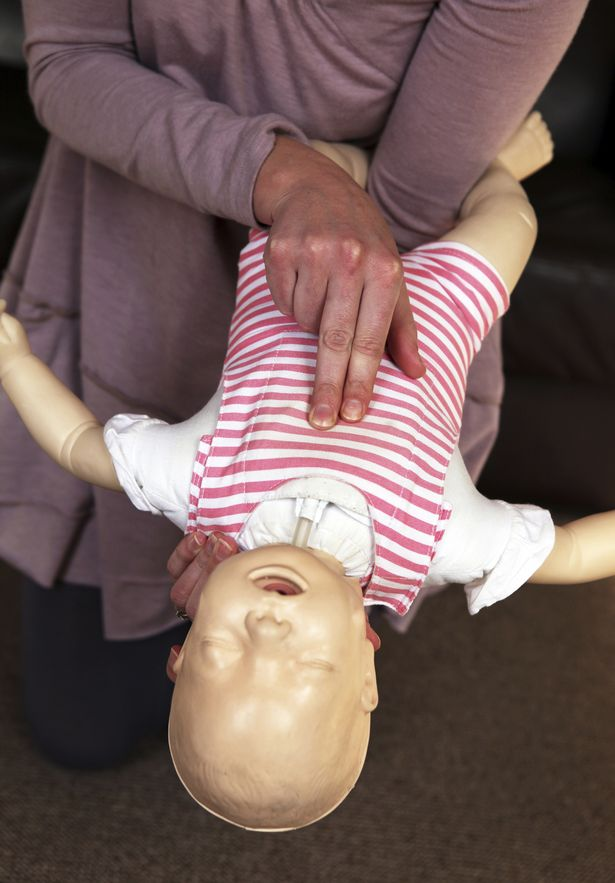
CHEST COMPRESSIONS
Chest compressions for adults: push hard and fast in the middle of the chest to a compression depth of between 5cm and 6cm and at a rate of at least 100 to 120 compressions per minute.
- Place the patient on a hard and flat surface, preferably not a bed;
- Place the palms of your hands on top of each other in the centre of the chest;
- Interlock your elbows so that you are directly above the patient’s chest;
- Push down hard on the chest to a depth of approximately 5-6cm and do not be afraid to push hard. You are trying to compress the heart between the sternum and the backbone/spine;

Always press straight down when performing CPR (Wikipedia, 2018)
- Release the compression and allow the chest to recoil back completely, but try not to lose your location/landmark on the chest, as you need to do compression after compression quickly, at a rate of 100 to 120 compressions per minute.


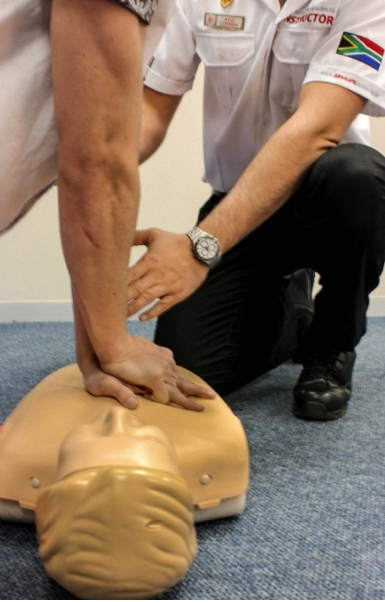
Correct hand placements and body positioning of the First Aider during chest compressions (Photos courtesy of Absolute Health Services)
AIRWAY OPENING:
The most common method used to open the airway is the head-tilt/chin-lift method:
An alternative method of opening the airway in patients who you may suspect a neck/spinal injury is called the ‘Jaw thrust method”. This method does not involve manipulation or movement of the neck when opening the airway thereby reducing any further injury to the trauma patient.


Artificial respirations using a Pocket Mask (Photos courtesy of Absolute Health Services)
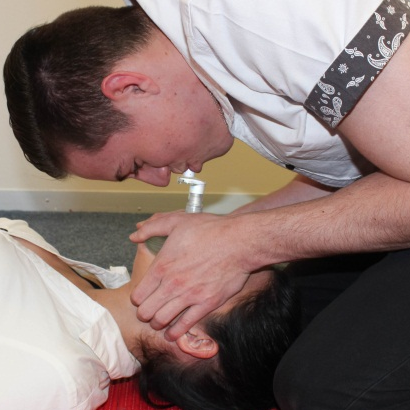
MOUTH-TO-MOUTH VENTILATIONS
CPR involves providing artificial ventilation by exhaling air from the rescuer or first aider’s mouth into the patient’s mouth. This is called mouth-to-mouth breathing, rescue breathing or ventilation.
After completing the 30 chest compressions and opening the airway (Always keep the airway open when delivering breaths), deliver 2 rescue breaths:
- Place the one-way valve face shield in place between the patient’s teeth or place the pocket mask over the patient’s front area of the face, covering the nose and mouth;
- With the hand that is tilting the forehead backwards, pinch the patient’s two nostrils closed;
- Place your mouth over the patient’s mouth, forming a seal so that air cannot escape;
- Deliver one breath by blowing exhaled air over one second into the patient’s mouth, airway, and lungs;
- If the patient’s chest rises, sufficient air has been delivered. Do not over blow or blow too hard, as air may enter the patient’s stomach and cause complications.
- Repeat the rescue breath.
RESCUE BREATHING:
If the patient has a pulse but is not breathing adequately or at all, you will need to assist them with breathing. This is called Rescue Breathing. Remember to ensure safety to yourself by using a one-way valve face shield or a pocket mask when providing rescue breathing.
To perform rescue breathing:
- Give a breath. Watch for chest rise.
- Give each breath over a second. Aiming for a rate of:
- Adults: 1 breath every 6 seconds
- Children: 1 breath every 5 seconds
- Infants: 1 breath every 4 seconds
THE AUTOMATED EXTERNAL DEFIBRILLATOR (AED)
As mentioned earlier, the availability and use of an AED is highly recommended, as it increases the survival rate percentage. However, the AED must be readily available and must be used quickly, ideally within the first few minutes, or at least within the first 10 minutes.
All AEDs are easy to use and have been designed for laypersons and first aiders to use. They have visual sticker or marking prompts to follow (Step 1, Step 2, and Step 3), as well as audio voice prompts to guide the user. The general sequence to follow is:
- Switch on the AED (Step 1);
- Apply the shock pads as directed on the packaging and plug in the pads’ cord to the AED machine;
- The AED will tell you to stand clear while it analyses the heart;
- The AED will either charge or not charge depending on the heart’s electrical status. The heart will either be shock-able or not shock-able;
- Once the AED is charged, it will prompt, ‘Stand clear, do not touch the patient’, or ‘Do not touch the patient, shock advised, stand clear’;
- Say, “Stand clear,” and double-check that no one is physically touching the patient. Push the shock or orange button and the shock will be delivered;
- Immediately continue with CPR/chest compressions.
PERFORMING CPR ON A CHILD
CPR on a child (one year of age to puberty) is not really different from an adult. You may use one hand when performing chest compressions if the child is small in size, but you must still compress to at least 5cm in depth. If the child is large in size, you may also use two hands as per the adult technique to perform chest compressions. The one-person CPR child ratio is also 30 compressions and 2 breaths, the same as the adult ratio.
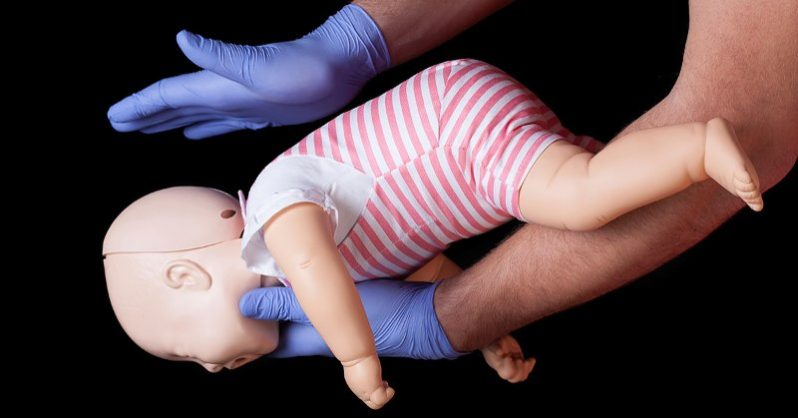
PERFORMING CPR ON AN INFANT
An infant is younger than one year of age. As the body size is small, use two fingers to perform the chest compressions and only compress the chest wall to 4cm in depth.
The one-person CPR infant ratio is also 30 compressions and 2 breaths, the same as the adult and child ratio.
The facial area is also small, so cover the nose and mouth when delivering breaths.

Performing CPR on an infant (Photos courtesy of Absolute Health Services
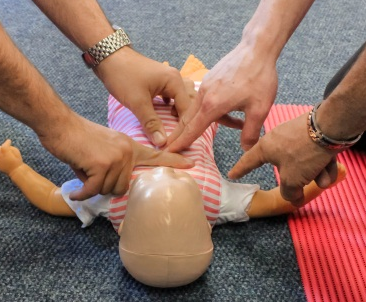
ADDITIONAL OR TWO-PERSON CPR
When assistance arrives or a second CPR-trained person arrives, one person can deliver the two breaths and the other person performs the chest compressions. You must swop after every five cycles, or two minutes, as the person performing compressions must not get tired, as that might hamper their efforts or result in poor compressions. During one-person CPR the CPR ratio is 30:2 for adults, children, and infants.
For two-person CPR, the ratios are:
- Adult: 30:2
- Child: 15:2 (CPR due to breathing/respiratory problems, so
breathe more)
- Infant: 15:2 (CPR due to breathing/respiratory problems, so
breathe more)
WHEN TO STOP CPR
Continue with cycles of 30 chest compressions and 2 breaths until you STOP:
S – Spontaneous breathing returns, the patient starts breathing again.
T – Trained professionals take over from you.
O – Out of breath or physically too tired/exhausted to continue with CPR.
P – Professional (paramedic, doctor, or another registered medical professional) declares that the patient is dead and you must stop CPR.
CHOKING
Choking is a mechanical obstruction of the flow of air from the environment into the lungs. Choking prevents breathing and can be either a partial or complete obstruction. A partial obstruction choking allows some air into the lungs. A complete obstruction chocking results in no air movement and is potentially fatal.
Signs and symptoms include:
- The person cannot speak or cry out, or has great difficulty doing so.
- The person desperately clutches their throat in ‘the universal choking sign’.
- The person may attempt to induce vomiting by putting their fingers down their throat.
- If breathing is not restored, the person’s face turns blue (cyanosis) from lack of oxygen.
- The person does any or all of the above, and, if breathing is not restored, then becomes unconscious.
- The person will usually start to suffer brain damage within approximately three to four minutes without air, and will usually die within six to eight minutes.
The type of choking most commonly recognised is the lodging of foreign objects or bodies (food, toys, or household objects) in the airway. This type of choking is often suffered by small children who are unable to appreciate the hazard of putting small objects in their mouths. In adults, choking most often occurs while people are eating.
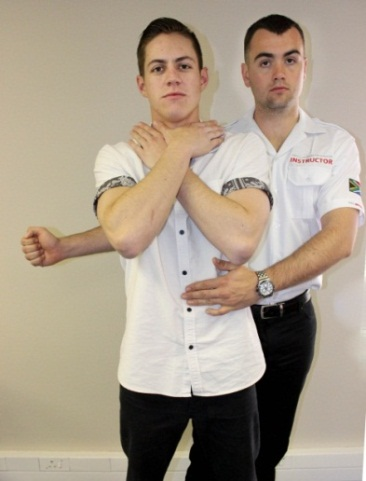
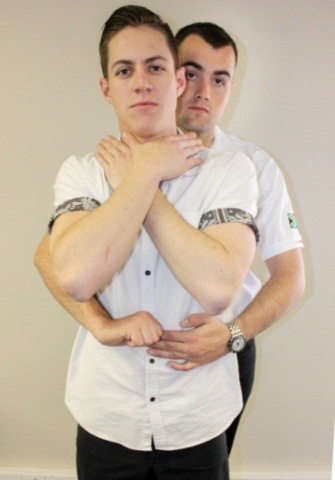
The Universal Choking Sign and Hand Placement for the Heimlich Manoeuvre (PBS News Hour, 2014) and Heimlich hand placement for a pregnant or obese person (Doctor You Need, 2018)
ADULT AND CHILD CHOKING PROCEDURE:
If an adult or child patient is conscious and choking, they will probably be clutching their throat, not breathing, and very stressed:
- Ask them, “Are you choking?” They will probably nod their head vigorously, or they might already be turning blue (cyanotic) and about to collapse.
- Ask them to try and cough the obstruction out.
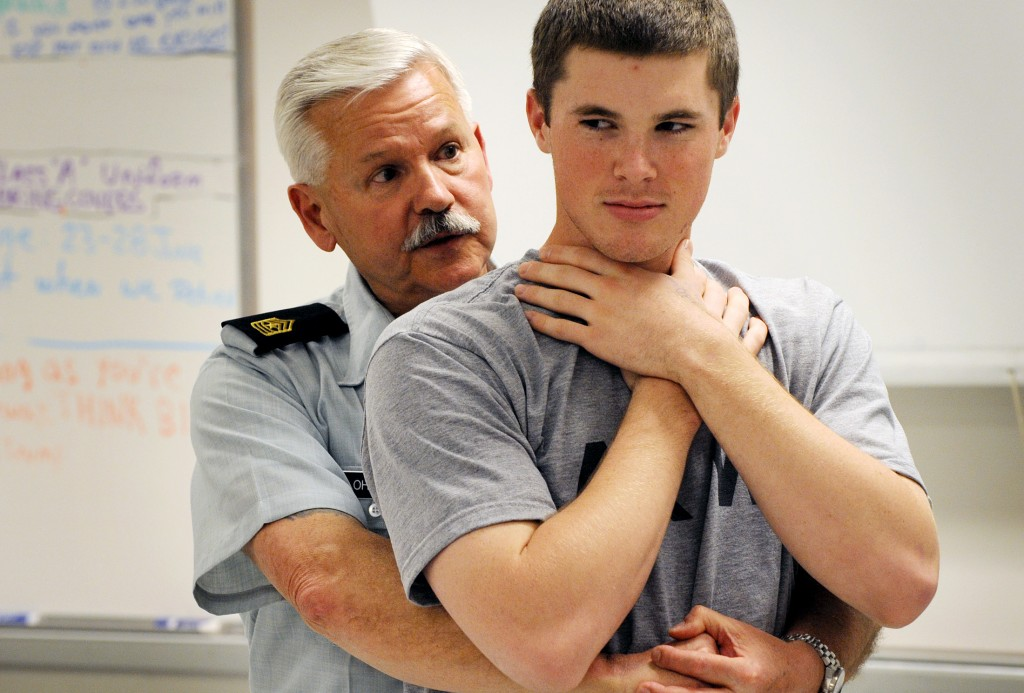
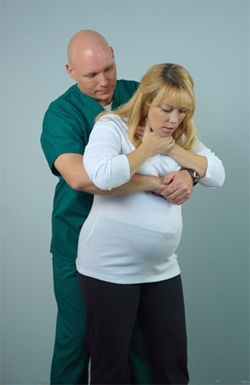
- If this is unsuccessful, perform the ‘Heimlich manoeuvre’:
- Stand behind the patient;
- Wrap your arms around their waist;
- Place your fist with thumb pointing inwards over the centre of their abdomen region;
- Pull inwards sharply and at the same time push the patient’s upper body forwards with your chest, so that they bend forwards.
- Perform the Heimlich manoeuvre until either the object dislodges or the patient becomes unconscious
- If the patient has collapsed and is unconscious, lay them on their back and check in the mouth to see if you can see the obstruction.
- If you can see the obstruction, try to remove it by performing a finger sweep.
- If you can’t see the obstruction immediately start with your CPR protocol of 30 compressions followed by 2 ventilations.
- Before giving the ventilations check in the patients mouth if you perhaps can see the obstruction.
- Continue until help or assistance arrives.

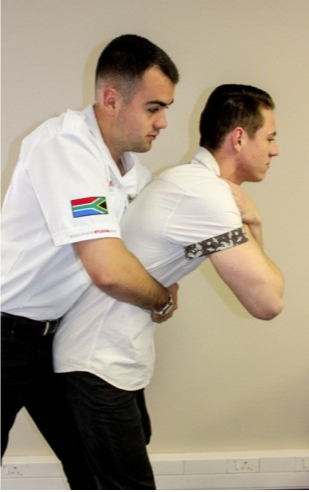
The Heimlich Maneuver (Photos courtesy of Absolute Health Services)
INFANT CHOKING PROCEDURE
An infant is a lot smaller, therefore, proceed methodically as follows:
- Kneel down on your haunches and hold the infant on your forearm with its head tilting downwards. Your forearm can rest on the thigh of one of your legs.
- Perform 5 ‘back slaps’ one after the other, between the infant’s shoulder blade, whilst supporting the infants face and head with your hand.
- Then turn the infant over, making sure that the infant’s head is still lower than the infant’s body in the head-downward direction, and look into the infant’s mouth to see if you can see the obstruction.
- Then perform 5 ‘chest thrusts’ the same as when performing CPR compressions, also with the infant’s head in the downward direction.
- Between each set of 5 back slaps and 5 chest thrusts, check in the mouth to see if the obstruction is visible. If so, remove it via a finger sweep manoeuvre. Do not blind sweep!
- If the infant becomes unconscious, start and perform the CPR process of administering 30 compressions and 2 breaths, but look in the mouth after every 30 compressions.
- If CPR or relieving the obstruction is successful, and the patient starts breathing again, place the patient is the lateral recovery position as explained previously. Monitor them every two to three minutes to ensure that they are still breathing.
Infant Choking Manoeuvres (The hearty soul, 2017) (Irish Mirror, 2017)
SECTION 4: BLEEDING, WOUNDS AND BURNS.
BLEEDING
Bleeding, also known as haemorrhaging, is blood escaping from the circulatory system. Bleeding can occur internally, where blood leaks from blood vessels inside the body, or externally, either through a natural opening such as the mouth, nose, ear, urethra, vagina, or anus, or through a break in the skin. Injuries and illness can damage blood vessels, which then leads to bleeding.
Bleeding can occur through damage to the following circulatory vessels:
- Artery: A bright red, spurting bleed called ‘arterial bleeding’, which is difficult to control.
- Capillary: A small, steady oozing of red blood, which is easy to control.
- Vein: A darkish bluish, slow or severe flow of blood called ‘venous bleeding’. If it’s a small venous bleed, it’s fairly easy to control. A large venous bleed is quite difficult, but possible, to control.

The 3 different types of bleeding (Firstaidforfree. 2018)
Hypovolemia is a massive decrease in blood volume, and death by excessive loss of blood can follow. The stopping or controlling of bleeding is an important part of first aid.
EXTERNAL BLEEDING CONTROL AND TREATMENT:
Remember your safety, so wear gloves and eye protection or a face shield. After checking and treating the primary survey, the last step is ‘Don’t delay: Stop any life-threatening bleeding’. This is achieved by doing the following 4 steps:
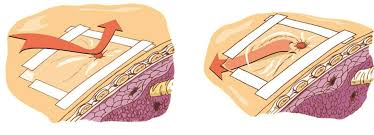
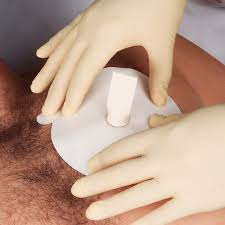
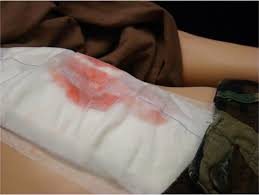
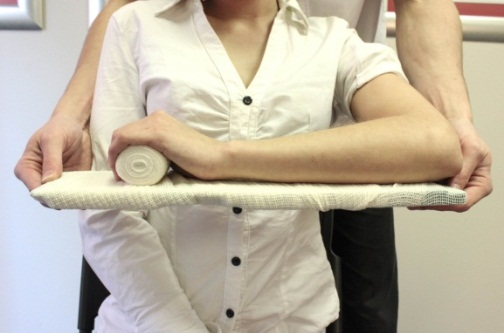
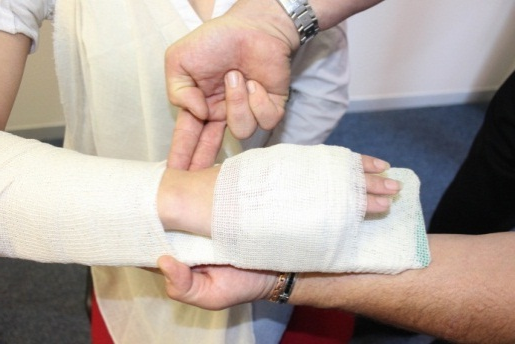
- Direct pressure: Apply direct local pressure to the bleeding site. Use gauze or a bandage and apply uninterrupted pressure.
- Elevate: Elevate the bleeding limb while you are applying the pressure. If there is a fracture, first splint and stabilise the fracture, then elevate the limb.
- Apply a pressure bandage: Apply a bandage or field dressing to the wound over the initial gauze or bandage used. Do not remove the initial material used, as this will dislodge the clots and cause bleeding to begin again. The pressure bandage must be tight, but not so tight that is stops blood flow entirely. There must still be a pulse and circulation below the site of the bleed.
- Splinting: Splinting the bleeding limb will assist in decreasing the bleeding. Some first aid kits have air splints, which are also very effective, as they apply pressure and reduce blood flow to the entire limb.

Bleeding Control Using Bandages (First Aid Training Classes, 2013) (St Johns, ND)
Uncontrolled bleeding can result in shock and death. When the first aider is unable to control severe bleeding after attempting all of the above methods, applying a tourniquet is another option. A tourniquet must be used as a last resort for serious, uncontrollable bleeding on the patient’s limbs (arms or legs). It is usually used when limbs have been amputated, to stop severe bleeding at the amputated wound site.
The patient, limb, and tourniquet must be carefully and constantly monitored when used.
TOURNIQUET USE:
Continue to apply pressure to the bleeding wound or wound site while applying the tourniquet.
Place the tourniquet strap and mechanism in place just above the bleeding site. Turn the tightening dial or tightening mechanism until the tourniquet strap applies a tightening circumferential pressure and the bleeding is reduced or stopped.
Make sure to mark and record the exact time when the bleeding stopped or the tourniquet was tightened. Once the tourniquet has been applied and tightened until the bleeding has stopped, leave it in place until you are able to hand over the patient to the emergency services.


A tactical tourniquet designed for severe uncontrollable bleeding (RFA Training, 2017),and an improvised tourniquet (The Free Dictionary, ND)
INTERNAL BLEEDING
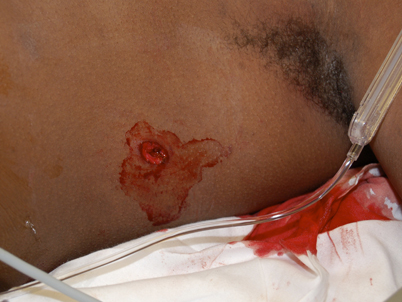
External bleeding is easy to recognise as there is obvious blood loss, but internal bleeding is not easily noticeable, as the patient bleeds into their body (abdomen, chest, or limbs). If you suspect there may be bleeding due to the MOI, or if the patient does not look well and seems to be in shock, look for signs like marking or bruising (contusions) on the abdomen, chest, or limbs, as shown in the pictures below. If present, there is a good possibility of severe internal bleeding.

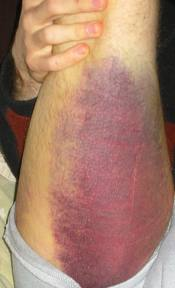
Signs of Internal Bleeding (Kardzmed, 2013) (Cochin Cardiac Club, ND)
There is not much that can be done in the pre-hospital environment to control internal bleeding. The patient needs to get to hospital as soon as possible, where surgery can be performed to stop the uncontrolled internal bleeding. Continue with the normal treatment procedure below, but make sure that the emergency services have been contacted and are on their way.
PRIMARY SURVEY TREATMENT:
- Hazards
- Hello
- Help
- Circulation
- Airway
- Breathing
- Don’t delay – Stop visible bleeding and call for backup
SECONDARY SURVEY TREATMENT:
- Vital signs
- SAMPLE history
- Head-to-toe examination
Refer to the Module 8 to see how the patient will be presenting when in shock.
WOUNDS
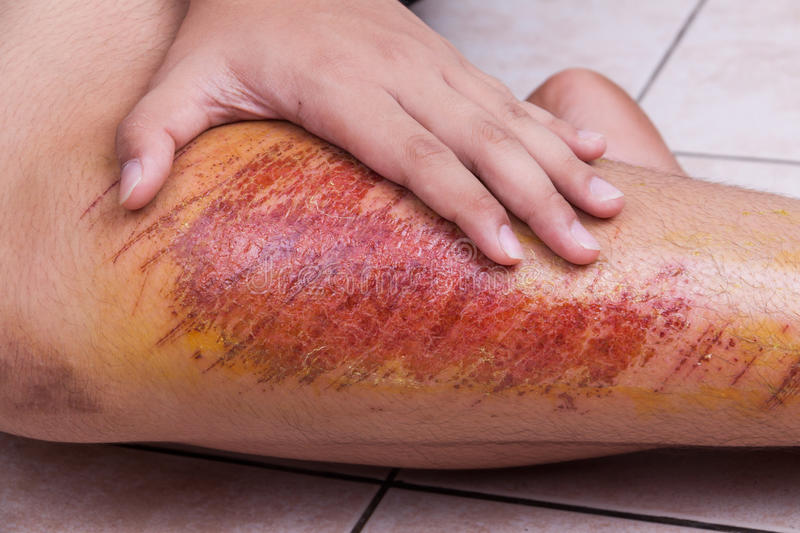
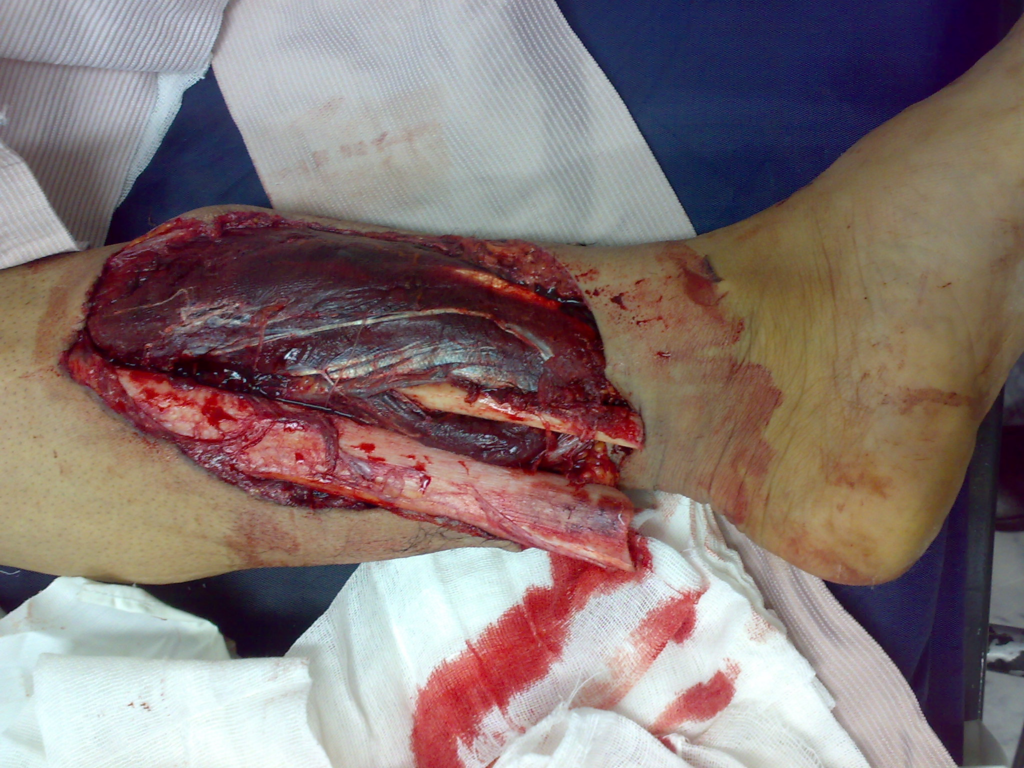
Traumatic bleeding is caused by some type of wound. There are different types of wounds that may cause bleeding. These include:
- Abrasion: Also called a graze. Caused by scraping/transverse action of a foreign object against the skin, and usually does not penetrate below the epidermis.
- Laceration: Irregular wound caused by blunt impact to soft tissue. Often results in a jagged or tearing wound.
- Incision: A cut into body tissue or an organ made by a sharp instrument such as a knife or scalpel.
- Avulsions: Injury in which a body structure is forcibly detached from its normal point of attachment. A type of amputation where the extremity is pulled off rather than cut off, or is hanging loose from one side of the wound but still attached by the other side.


Laceration (Slideplayer. 2018), Incision (Boston University School of Medicine, ND)

Abrasion (Dreamstime, 2018), Haematoma (Researchgate, 2009)


Contusion (Care CPR First Aid, 2013), Avulsion (Periasamy, M et al. 2012)
Gunshot wound entrance and exit (Tanaka, N et al. 2016) and a shotgun wound (The Huffington Post, 2018)
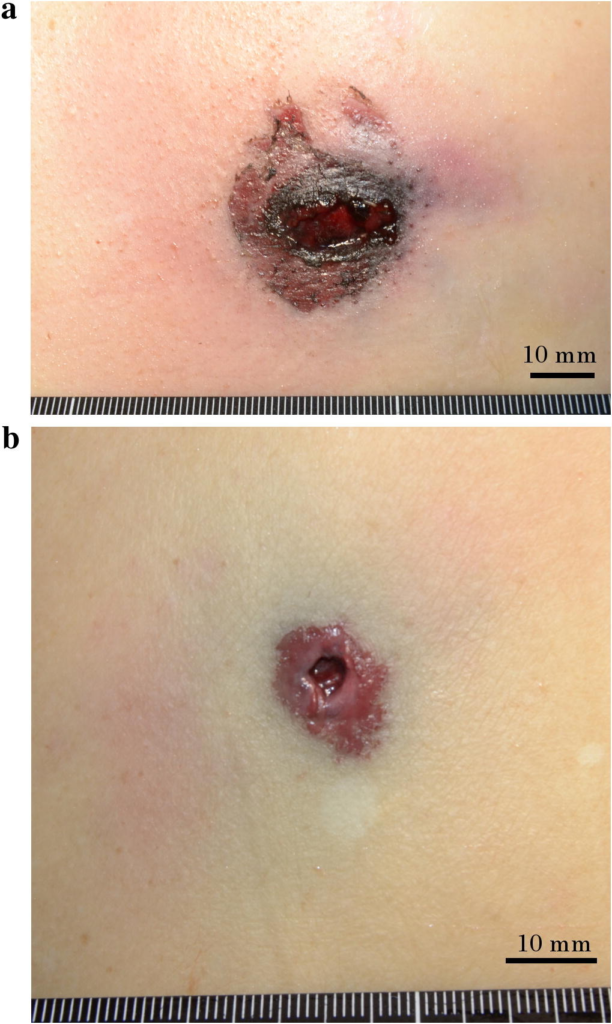
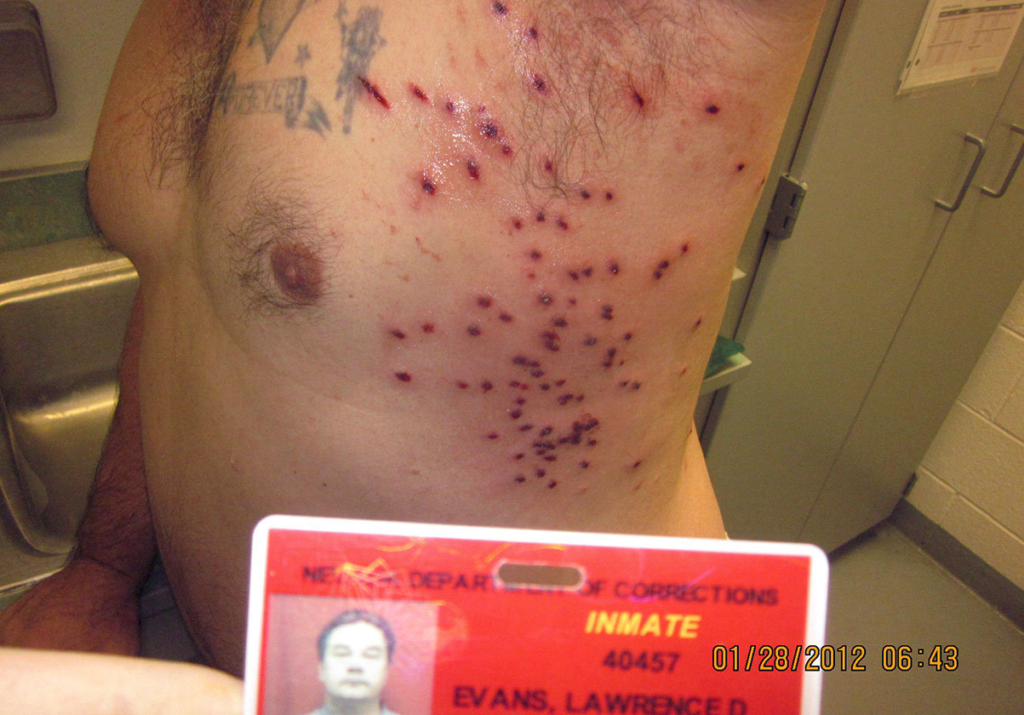
- Puncture wound: Caused by an object that penetrated the skin and underlying layers, such as a nail, needle, or knife.
- Contusion: Also known as a bruise. This is due to a blunt trauma damaging tissue under the surface of the skin, which has bled and now has a dark, bluish colour.
- Hematoma: Caused by damage to a blood vessel that in turn causes a fairly large amount of blood to collect under the skin. Often accompanied by a bump or swelling under the skin.
- Gunshot wound: Caused by a weapon such as a firearm. This may include two external wounds (entry and exit). The entry wound is smaller than the exit wound. High velocity weapons (assault and hunting rifles) cause massive destruction and trauma, while low velocity weapons don’t cause as much tissue destruction.
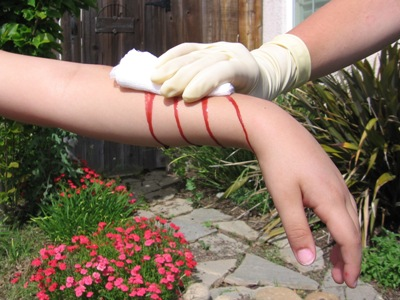
WOUND CARE AND TREATMENT
- As a first aider, ensure that you wear gloves and look after your own safety.
- The severity and degree of bleeding will determine how much gauze and bandaging material you will need.
- Wipe away any dirt, blood, or foreign material around the wound.
- Place gauze over the wound (cover the whole wound) and then wrap a conform bandage or normal bandage over and around the whole wound.
OTHER TYPES OF WOUNDS AND BLEEDING, AND TREATMENT
The body is able to bleed from anywhere, as there is blood supply to all the cells of the body. The forces involved (MOI), body area damaged, and severity of medical illness will determine where and how severely a wound will bleed.
- Ear wounds
Bleeding from the ears could be a sign of a dangerous head injury, so try to determine if the bleeding is local tissue damage or if the bleeding is coming from inside the ear canal. If bleeding is coming from within the ear canal and is accompanied by other head injuries or a concerning MOI, the patient may have a dangerous head injury.
If this is the case, keep the patient still, support and stabilise the head, and continue with the normal primary and secondary survey treatment.
If the bleeding ear wound is local tissue and not internal, just cover the whole ear with gauze and strap in place with medical tape. Do not force any dressings or gauze into the ear canal and also leave impaled objects in, do not remove them.
- Eye wounds and bleeding
Although not life-threatening, eye injuries are serious injuries. Damage could be permanent and result in a disability or loss of sight. As a first aider, there is not much that can be done, apart from covering the whole eye with gauze (preferably sterile gauze) and strapping the gauze in place. Most first aid kits have eye pads or shields, so use these to cover the eye and hold the gauze in place.
- Nose wounds and bleeding
The causes of nosebleeds can generally be divided into blunt trauma (usually a sharp blow to the face, such as a punch, sometimes accompanied by a nasal fracture), insertion of a foreign body (such as fingers during nose-picking), or an inflammatory reaction (such as respiratory tract infections like chronic sinusitis).
The flow of blood normally stops when the blood clots, which can be achieved by applying direct pressure by pinching the soft, fleshy part of the nose. Pressure should be firm and should be applied for at least five minutes and up to 20 minutes. Tilting the head forwards helps to decrease the chance of nausea and airway obstruction.
Swallowing excess blood can irritate the stomach and cause nausea and vomiting, so encourage the patient to let the blood drain forwards and outwards.

Nose bleeds occur often due to various reasons (The New Times, 2016)
- Impaled objects
Impaled objects such as knives, branches, or other foreign objects must not be removed, but rather secured in place with ring bandages and bandages. Removing the objects will result in excessive bleeding that might not stop. These objects will be removed in hospital.
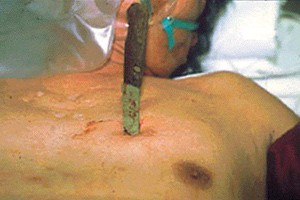

An impaled object should never be pulled out (Salomone, 2011) and should be secured using a ring bandage or packed with gauze and bandages (NLC First Aid, 2010)
- Amputations:
Amputations are when a portion of the anatomy has been completely severed from the rest of the body. The most common occurrences are fingers or limbs.
Treatment here would involve, stooping the bleeding as discussed in this section.
- Direct pressure
- Elevate
- Pressure Bandage
- Splint
If the amputated part is salvageable, place in a bag of ice or wrap in moist dressings to go along with the patient to the hospital.
BURNS
1. CLASSIFICATION OF BURNS
A burn is a type of injury to skin or other tissues that is caused by heat, cold, electricity, chemicals, friction, or radiation. Most burns are due to heat from hot liquids, solids, or fires.
The severity of a burn is determined by the depth of the burn:
SUPERFICIAL BURN
Burns that affect only the superficial skin layers are known as superficial or first-degree burns. They typically appear red in colour, without blisters. Superficial burns cause pain lasting two to three days, followed by peeling of the skin over the next few days.
PARTIAL-THICKNESS BURN
When the injury extends into some of the underlying skin layer, it is a partial-thickness or second-degree burn. Blisters are frequently present and they are often very painful. Healing can require up to eight weeks and scarring may occur.
FULL-THICKNESS BURN
In a full-thickness or third-degree burn, the injury extends to all layers of the skin and may be pink, white, or black in colour. Often there is no pain (as the nerves have been destroyed) and the burn area is stiff. Healing typically does not occur on its own.
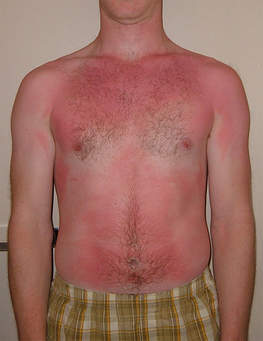


Superficial (Egro, F. ND), Partial-thickness (Rennie, S. 2012) and Full- thickness burns (Memorang, 2018)
2. THE RULE OF NINES
To estimate the body surface area of a burn, the rule of nines is used. It assigns a basic surface area to each major body part. This allows the first aider or emergency medical service provider to obtain a quick estimate of how much body surface area is burned.
- Head and neck 9%
- Each arm is 9% 18%
- Front of trunk (top and bottom each 9%) 18%
- Back of trunk (top and bottom each 9%) 18%
- Each leg is 18%
- Genitals 1%

Rule of Nines (WebMD, 2018)
3. CAUSES OF BURNS
Burns are caused by a variety of external sources, classified as thermal (heat related, such as fire or flame), chemical, electrical, and radiation.
THERMAL
Fires and hot liquids are the most common causes of burns. Scalding is caused by hot liquids or gases and most commonly occurs from exposure to hot drinks, high temperature tap water in baths or showers, hot cooking oil, or steam.
CHEMICAL
Chemicals cause a small percentage of all burns. Chemical burns can be caused by many different substances, most of which are either a strong alkaline or acid base.
ELECTRICAL
Electrical burns or injuries are classified as high voltage (greater than 1000 volts) or as flash burns secondary to an electric arc. The most common causes of electrical burns are electrical cords, followed by electrical outlets. Lightning may also result in electrical burns, as a result of outdoor activities. While electrical injuries primarily result in burns, they may also cause fractures or dislocations secondary to blunt force trauma or muscle contractions.
RADIATION
Radiation burns may be caused by exposure to ultraviolet light (such as from the sun, tanning booths, or arc welding) or from ionizing radiation (such as from radiation therapy, X-rays, or radioactive fallout).
4. TREATMENT
Cooling with tap water helps relieve pain and prevents the damage area from spreading, so the immediate priority for burns is to cool the burn down with cool tap water. After cooling the burn wound, follow by applying moist bandages or dressings over the whole surface area burned. Blisters must be left intact and not popped.
Extensive burns often require assistance so call for backup or emergency services ASAP.
BurnShield is an excellent product and should be available in first aid kits and other emergency packs. Apply burnshields to all of the burned areas, leave in place, and cover with moist bandages. Burnshields cool the burns and also assist with pain relief.
Remember to:
- Ensure safety, as this is a serious hazard;
- Apply a copious amount of water to thermal burns;
- Brush the chemicals off a burn victim. Do not use water, as water might have a chemical reaction with the chemical;
- Do not forcefully remove any burned material that is attached to the skin, rather cut around where the material is sticking to the skin;
- Remove rings and tight bracelets before swelling occurs;
- Do not apply other materials or agents, such as sugar, toothpaste, Vaseline, etc., as these will cause additional damage and complications;
- Make sure that backup/emergency services are on their way.
SECTION 5: HEAD, SPINAL, CHEST, ABDOMINAL, PELVIC AND FRACTURE INJURIES.
HEAD INJURY GENERAL INFORMATION
A head injury is any injury that results in trauma to the skull and/or brain. Head injuries may be categorised as open (penetrating) or closed head injuries, depending on if the skull is broken or not. There are many causes of head injuries, including accidents, falls, physical assault, or traffic accidents. Many of these are minor, but some can be severe and require hospitalisation.
Unlike a broken bone, where trauma to the body is obvious, head trauma can sometimes be inconspicuous and not noticeable, especially in closed head injuries. In the case of an open head injury, the skull is cracked and broken by an object that makes contact with the brain and leads to bleeding.
SIGNS AND SYMPTOMS
- Patients suffering from head and brain injuries may initially appear normal and conscious, but at a later stage the patient may deteriorate and become unconscious.
- A patient may present with symptoms of a head injury, which include coma, confusion, drowsiness, personality change, nausea and vomiting, headaches, mismatched pupil sizes, seizures (fits), and eventually death (if severe).
- Symptoms of skull fracture can include leaking cerebrospinal fluid (a clear fluid drainage from the nose, mouth, or ear), which is a strong indication of a base of skull fracture (internal skull bone fracture) and the tearing of sheaths surrounding the brain. This is a very serious head and possibly brain injury.
- Because brain injuries can be life-threatening, even people with apparently slight injuries, with no noticeable signs or complaints, require close observation. The caretakers of patients with mild trauma who are released from the hospital are frequently advised to rouse the patient several times during the next 12 to 24 hours to assess for worsening symptoms.
TREATMENT OF HEAD INJURIES
Head injuries are often accompanied by spinal injuries, as a large force is required to cause concerning damage to the head and the spine may be injured at the same time.
- Stabilise the patient’s head, in the position you found them, by placing both gloved hands holding the sides of the patient’s head.
- Assess the patient’s primary survey and determine their LOC (are they alert or unconscious?).
- Spend time ensuring that the patient’s airway is satisfactory (no gurgling or choking sounds). If not, ask bystanders to assist you and turn the patient into a lateral position (not lateral recovery position).
- Continue with the rest of the primary and secondary survey treatment process.
- Cover any head wounds with gauze dressings and loose bandages. Do not exert too much pressure on the wound, as this may cause further bone and brain injury.
- Keep the patient in the position you found them, or a lateral position, until the emergency services arrive. If the patient needs to be moved, then immobilise the patient onto a supporting log/spine board or similar device (you may need to improvise and use something like a door or wide plank).

Various head and spinal injuries (Harper, B. 2011) (Morales, M. ND) (Reporter, W. 2012)
CONCUSSION
The word concussion refers to a mild brain injury. This injury results due to a blow to the head that could make the person’s physical and emotional behaviour change or become irregular. Symptoms may include clumsiness, fatigue, confusion, nausea, blurry vision, headaches, and others. Concussion may have a history of seconds to minutes of unconsciousness, then normal arousal. Disturbances of vision and balance may also occur.
TREATMENT
A concussion injury is not as severe as a head injury, so follow the normal primary and secondary survey treatment process. If there is no accompanying neck pain or indications of a spinal injury, it may not be necessary to fully immobilise the patient. However, it is preferable to keep the patient’s head stabilised until help arrives.
Should any contact sport, such as rugby, be the cause of the incident, do not allow the patient back onto the field to continue, as they need to have a ‘concussion test’ performed and will most likely not be allowed to continue playing. Another bump to the head of a concussed patient may result in a serious head injury with dire complications.
2. SPINAL INJURIES
A spinal cord injury (SCI) is damage to the spinal cord that causes changes in its function, either temporary or permanent. These changes cause loss of muscle function, sensation, or autonomic function in parts of the body served by the spinal cord below the level of the injury. Injuries can occur at any level of the spinal cord and can be classified as complete injury, which is a total loss of sensation and muscle function, or incomplete, meaning some nervous signals are able to travel past the injured area of the cord. Depending on the location and severity of damage along the spinal cord, the symptoms can vary widely, from pain or numbness, to paralysis, to incontinence.
SIGNS AND SYMPTOMS
Signs and symptoms vary depending on where the spine is injured and the extent of the injury. If there is a complete severing of the spinal cord then all movement and feeling below that point will be lost.
- If the injury is high up in the neck (cervical) region, then all four limbs (arms and legs) will lose all their movement and feeling function. This is called quadriplegia.
- If the injury is low down in the back (lumbar) region, then two limbs (the legs) will lose all their movement and feeling function. This is called paraplegia.
- Some patients may experience ‘pins and needles’ in their limbs, which means there may be pressure or swelling on the spinal cord causing the pins and needles.
- If the injury is high and severe, then the patient may have breathing difficulty or may not be breathing at all.
- MOI is an important tool to use in determining whether you need to treat for spinal cord injury. If you suspect a spinal cord injury, then be safe and treat for a SCI.
TREATMENT
- The first stage in the management of a suspected spinal cord injury is geared towards basic life support and preventing further injury.
- Maintain airway, breathing, and circulation, and immobilise the spine.
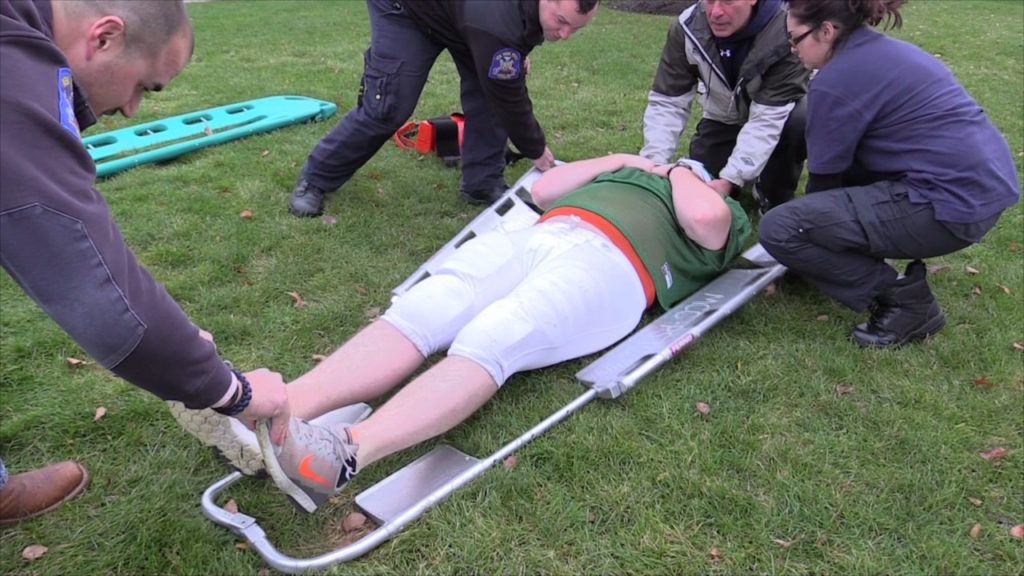
Paramedics initialising spinal immobilisation (Sports Medicine Concepts. 2016)
3. CHEST INJURIES
A chest injury is any form of physical injury to the chest, including the ribs, heart and lungs. Typically, chest injuries are caused by blunt mechanisms, such as motor vehicle collisions, or penetrating mechanisms, such as stabbings. A chest injury can be a small laceration or wound to the chest area, but it can also be a deep, penetrating wound that damages the lungs, large blood vessels, heart, and spinal cord.
A chest injury can cause air to leak out of the lacerated lung and into the pleural space (the space between the ribs and the lungs). Chest injuries result in injuries called:
- Pneumothorax: air trapped between the ribs and the lungs.
- Haemothorax: blood trapped between the ribs and the lungs.
- Haemo-pneumothorax: blood and air trapped between the ribs and the lungs.
- Tension pneumothorax: A high build-up of air pressure, between the ribs and lungs, causing internal chest pressure complications, which lead to death if untreated.

A sucking chest wound (Rathert, N. Gilmore, W.S., 2013).
PNEUMOTHORAXES ARE DIVIDED INTO OPEN AND CLOSED TYPES
- An open pneumothorax occurs when there is open communication between the environment and the pleural cavity (the space between the ribs and lungs) through the chest wall. It is referred to as a sucking chest wound. In a sucking chest wound, air is sucked into the thoracic cavity through the chest wall, instead of into the lungs through the normal breathing airways. This occurs because air follows the path of least resistance. The patient will have an open wound to the chest that will normally bubble blood with breathing.
- A closed pneumothorax is one that is associated with a trauma (normally blunt trauma), in which the chest wall remains intact. This is often explained by a broken rib that punctures the lung tissue and leads to air leaking out of the lung into the space between the ribs and lung. Air does not enter the environment.

SIGNS AND SYMPTOMS OF CHEST INJURIES
The complications of chest trauma are numerous, ranging from simple bruising to circulatory collapse and death.
Signs and symptoms include:
- An obvious open chest wound, or bruised closed chest wound with fractured ribs.
- A bubbly and bloody wound, with air bubbles present when the patient breathes.
- Difficulty in breathing (dyspnoea), due to pain or internal chest complications.
- Cyanosis: dark blue discolouration of the lips, nail beds, and skin, due to lack of oxygen in the blood.
- A fast heart rate initially (above 100 beats per minute). Later, during the end stages of a tension pneumothorax, the heart rate starts to fall rapidly to a slow rate (below 60 beats per minute) and eventually stops.
- Signs of shock due to severe blood loss into the chest cavity.
- Unconsciousness.
- Death.
TREATMENT OF CHEST INJURIES
Pre-hospital treatment of a serious chest injury is limited. Rapid transport to hospital and early surgical intervention in the emergency rooms and theatre is the best treatment and management.
- Remember safety: these injuries are often a result of penetrating trauma such as a knife or bullet, so first ensure that it is safe to approach, and if not, wait for the police or security to arrive.
- Primary survey: if the primary survey is not adequate, then the patient’s chest injury is severe.
- Ensure that backup has been called, as the patient needs to get to hospital as soon as possible.
- Early treatment of a sucking chest wound includes placing an air-occlusive dressing over the site and taping it on three sides. This dressing prevents additional air from entering the pleural cavity during inhalation while allowing trapped air to escape from the un-taped edge during exhalation.
- Complete the secondary survey and check for any other hidden injuries when completing the head-to-toe examination.
- Check for signs and symptoms of a spinal injury, as the bullet or knife blade may have damaged the spinal cord. If the patient can feel and move their hands and feet, then they should not have a spinal injury.
A three-way occlusive dressing (My Triage Kit, ND) and a dressing with a release valve (Bound Tree, 2015).
ABDOMINAL INJURIES
The abdomen contains a few vascular rich organs like the kidneys, spleen and liver which may cause a patient to bleed to death should they get damaged by trauma. A lot of these injuries aren’t picked up early enough as the bleeding is internally and a lot of blood can be lost into the abdominal cavity before it is noticed. It is therefore very important to give special attention to the abdominal area if injury is suspected.
CLOSED ABDOMINAL INJURY
SIGNS AND SYMPTOMS OF A CLOSED ABDOMINAL INJURY
- Severe pain. This can be localised to a specific quadrant with palpitation in an attempt to figure out where the injury is.
- Nausea and vomiting.
- Bleeding in the abdomen may show under the skin causing discoloration.
- Confusion, unconsciousness and death may follow severe bleeding in the abdominal cavity.
OPEN ABDOMINAL INJURY
ABDOMINAL EVISCERATION
Disembowelment, or evisceration, is the removal of some of the organs of the gastrointestinal tract (bowels), usually through an incision made across the abdominal area.
Keep the exposed organs moist and warm, or the intestines will dry out and become brittle. Cover all the exposed organs with a large, moist (use sterile water or clean tap water if sterile is not available) wound dressing or bandage. If you do not have any bandages large enough, use a clean sheet. Do not use any adherent or material that loses particles (such as cotton wool), as this will adhere to the intestines or bowels. Try to support the hanging bowels and take pressure off the site where the bowels exit the abdominal wall. This will help with blood flow to the external protruding bowel.

Bowel evisceration (Nguyen, MH. et al. 2009) and treatment (Nursing Fundamentals, 2007
PELVIC INJURIES
The history is the most important piece of information when suspecting a pelvic fracture. High impact blunt trauma, penetrating trauma or falls from heights are usually the causing factors of pelvic fractures. Signs and symptoms would include severe pain, crepitus on palpitation, inability to walk, deformity and a low blood pressure. Treatment would involve eliminating spinal injuries, strapping the pelvis tightly using a sheet, treat all other obvious injuries and transport to hospital as soon as possible
FRACTURES
A fracture is a break or crack in a bone. In most cases, the damage to the bone will be under the skin, which is called a closed fracture. Sometimes, bits of the bone can puncture through the skin to become an open fracture. In both cases, you’ll need to treat the casualty for possible shock. Even if you can’t see any blood, the break might have caused some internal bleeding.

Open fracture (Wikipedia Commons, 2016) and Closed fractures (Healthable, 2017)
SIGNS AND SYMPTOMS:
· Pain and guarding are one of the most obvious indications.
- Bone protruding out of the skin (open fracture).
- Tenderness, bruising, and swelling around the area of the fracture, which is tender to touch.
- Patient has difficulty moving, or is unable to move.
- Movement in an unnatural direction.
- A limb that looks shorter, twisted, or bent (deformity).
- A grating noise or feeling when touching the limb (crepitus).
- Loss of strength and movement.
- Shock (signs and symptoms of shock).
TREATMENT OF A FRACTURE
- Ensure that it is safe to approach the scene.
- Check and ensure the primary survey is satisfactory.
- Attend to any obvious injuries, such as the fracture.
- If it is an open fracture, cover the wound with a sterile dressing and secure with a bandage.
- Support the injured body part to stop it from moving. This should ease any pain and prevent any further damage.
- Protect the injured area by using bandages to secure it to an uninjured part of the body to stop it from moving.
- Apply a padded splint (more comfortable) to the fracture to support the fracture, and bandage the splint in place. Make sure that the bandage is not too tight and that there is blood circulation beyond the fracture site. While applying the splint, ensure that you support the broken limb with your hands. When in doubt, splint.
- After applying the bandages and splint, check the distal part of the limb’s circulation (pulses and capillary refill) to ensure that the bandage is not too tight and restricting blood flow.
- Keep checking the patient for signs of shock. This does not mean emotional shock. Shock is a life-threatening condition, often caused by loss of blood.
- If they lose responsiveness at any point, open their airway and check their breathing (primary survey) to ensure that the patient is still breathing.

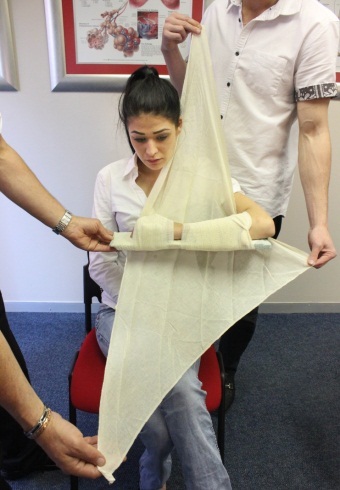
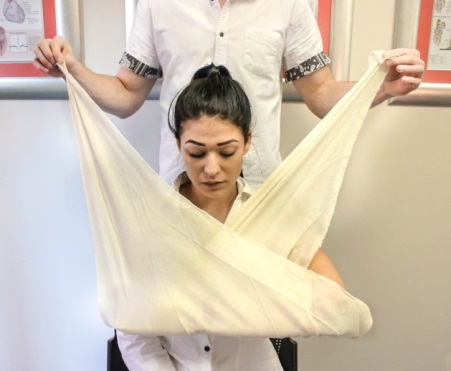
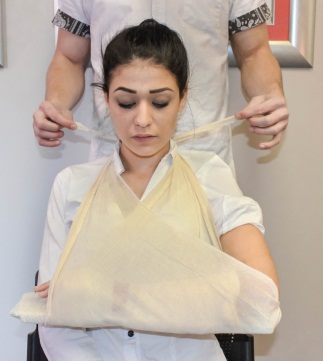


Splinting an arm (Photos courtesy of Absolute Health Services)
STRAINS AND SPRAINS
When excessive force is applied to a joint, the ligaments that hold the bones together may be torn or damaged. This results in a sprain, and its seriousness depends on how badly the ligaments are torn. Any joint can be sprained, but the most frequently injured joints are the ankle, knee, and finger.
Strains are tears in the muscle. Sometimes called pulled muscles, they usually occur because of overexertion or improper lifting techniques. Sprains and strains are common and anyone can experience them.
People who are active in sports suffer more strains and sprains than less active people. Repeated sprains in the same joint make the joint less stable and more prone to future sprains.
TREATMENT OF STRAINS AND SPRAINS
First aid for strains and sprains consists of RICE: Rest, Ice, Compression, and Elevation of the limb. Place a cold pack or a bag of ice over the sprained area for a long time, 15 minutes at least.
Patients with severe sprains of the ankles and knees usually need crutches or plaster casts to recover.
SECTION 6: ENVIRONMENTAL EMERGENCIES, NEAR DROWNING, BITES & STINGS AND POISONING.
FROSTBITE
Frostbite occurs when the body is exposed to extremely cold or freezing temperatures and the body tissues start to freeze. In cold environments, a normal body reaction is for blood vessels to contract and move blood away from the extremities to the central parts of the body. Any exposed body parts have minimal blood flow, and are affected by the extreme cold and start to freeze.
Frostbite normally affects the fingers, hands, toes, feet, nose, and facial areas. Signs of frostbite include dry, hard, cracked skin tissue with a dark blue or black discolouration due to the tissue freezing and dying.
TREATMENT OF FROSTBITE
- Remove the patient from the cold or freezing environment and ensure that there is no possibility of hypothermia. Keep the patient warm.
- Carry out primary survey treatment.
- Fill a shallow container with enough water to cover the frostbitten body part. Make sure that the water is at room temperature. The water does not have to be cool, but it cannot be too warm. The higher the water temperature, the more painful it is, so rewarm the frostbitten parts slowly. Completely immerse the injured area and ensure that the skin does not come into contact with anything but the water.
- Repeat the above step by refreshing the water as it cools until the skin is back to a normal colour and texture. This may take several hours, depending on the severity of the injury. In some cases, the frostbite is too severe and the patient may lose the affected body parts by amputation.
- Make sure that there is no risk of re-freezing. Skin that re-freezes after thawing will be more damaged.
- Notify the emergency services as soon as possible or be prepared to transport the patient to a medical facility, even after treatment of frostbite.
DROWNING
These can happen at home in the swimming pool, in rivers or dams while doing water sports, in the ocean from rip currents, or accidental deaths when people who can’t swim falls into water. There are different types of drownings:
- Dry-drowning – When someone goes unconscious underwater he / she will “breathe” in water. His / her vocal cords will contract on contact to prevent water from entering the lungs. The lungs are still full of air and these patients will usually float. Resuscitation efforts have a higher success rate on these patients.
- Wet-drowning – If the dry-drowning victim stays underwater with no oxygen entering the body then the vocal cords will relax due to hypoxia and water will enter the lungs. These patients will often sink to the bottom of the body of water. Resus attempts on these patients are rarely successful because the lungs are full of water.
- Secondary drowning – When a victim drowns in dirty or salty water but is resuscitated successfully, they can still “drown” a day or two later while in hospital. The high concentration substance in the lungs would draw fluids from the circulatory system into the lungs causing the patient to drown on his own fluids. This also known as pulmonary oedema
TREATMENT FOR A DROWNING VICTIM
- Determine whether the patient could have sustained a spinal injury from diving into the bottom of a pool or river bed. If it is suspected, then spinal immobilise the patient where possible, remember this is a life over limb situation.
- Remove the patient from the water.
- Roll the patient into the recovery position to drain out any water in the airway.
- Roll the patient back onto his back and start CPR.
- Whenever fluid is noticed in the back of the throat roll the patient into the recovery position to drain.
- Carry on with CPR until the patient shows signs of life or medical assistance arrives.
BITES AND STINGS
Insect bites and stings occur when an insect is agitated and seeks to defend itself with its natural defence mechanisms, or when an insect seeks to feed off the bitten person. Some insects inject formic acid, which can cause an immediate skin reaction, often resulting in redness and swelling in the injured area. Stings from fire ants, bees, wasps, and hornets are usually painful, and may stimulate a dangerous allergic reaction called anaphylaxis.
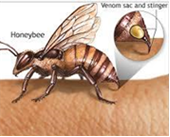

SIGNS AND SYMPTOMS OF INSECT BITES AND STINGS
- Itching and swelling at the bite or sting site.
- In some instances, the insect or a part of the insect will still be attached to the bite or sting site (for example ticks and bees).
- If the insect is very venomous, severe localised tissue damage (cytotoxicity) can occur over days, resulting in severe limb swelling and dark local skin discolouration due to dead tissue.
- Severe and fatal neurological complications (neurotoxicity) may occur within minutes or hours, resulting in difficulty breathing and anaphylactic shock, and in some cases death.
TREATMENT OF INSECT BITES AND STINGS
- Some insects live in swarms, so ensure that it is safe to approach and make sure that you do not get stung or bitten.
- If the sting is still impaled in the patient, use a sharp blade to scrape the sting out. Using your fingers or tweezers may push poison through the sting into the patient.
- The application of an antihistamine ointment will also assist in reducing the itching and pain from the bite or sting.
- If the patient starts to develop difficulty breathing or goes into shock, begin the primary and secondary survey process and treat the patient accordingly.
SNAKEBITES
Snakes bite both as a method of hunting and as a means of protection. Risk factors for bites include working outside with one’s hands, such as in farming, forestry, and construction. Snakes commonly involved in poisonings include cobras, adders, mambas, vipers, and sea snakes.
The majority of snake species do not have venom and instead kill their prey by squeezing them. However, venomous snakes can be found on every continent except Antarctica.
Determining the type of snake that caused a bite is often not possible. Prevention of snake bites involves wearing protective footwear, avoiding areas where snakes live, and not handling snakes. A snakebite by a large non-venomous species e.g. a molesnake or a python can still cause severe injury which may require stitches and may lead to secondary infections.
TYPES OF SNAKE VENOM
- Cytotoxin – Cytotoxic venom is a cell destroyer causing cell necrosis. Species responsible are Puff Adders, Gaboon Adders, and the spitting cobras (Mozambican Spitting Cobra and Black Spitting Cobra).
- Neurotoxin – This venom caused the breathing muscles to become paralysed leading to respiratory arrest and death. Species responsible are Black mamba, Green Mamba, Rinkhals, Non-Spitting Cobras (Cape Cobra, Forest Cobra, Snouted Cobra).
- Haemotoxin – This type of venom destroys the clotting factor of blood leading to massive bleeding. Species responsible are Boomslang and Vine snake.
SIGNS AND SYMPTOMS OF SNAKEBITES
- Sometimes venom is injected with the bite, resulting in redness, swelling and severe pain at the bite area.
- Vomiting, difficulty seeing, tingling of the limbs and sweating may result. Most bites are on the extremities.
- Venom may cause bleeding, kidney failure, a severe allergic reaction, tissue death around the bite, breathing problems or severe bleeding.
- Puff adder bites may result in the loss of a limb or other chronic problems.
- The outcome depends on the type of snake, the part of the body that was bitten, the amount of venom injected and the general health conditions of the bitten person. Problems are often more severe in children than adults, because of their smaller size in relation to the amount of venom injected.

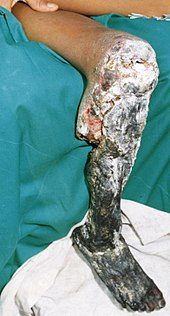
Severe tissue necrosis following cytotoxic (tissue destroying) puff adder envenomation that required amputation above the knee. The person was an 11-year-old boy, bitten two weeks earlier but treated only with antibiotics.
TREATMENT OF SNAKEBITES
- Safety is a priority, as the snake may still be close by.
- Monitor the patient’s primary survey closely, as they may go into breathing/respiratory failure.
- It is recommended that you wash the wound with soap and water and hold the limb still.
- Do not try to suck out the venom, cut the wound with a knife or use a tourniquet.
- If the patient was bitten by a neurotoxic snake, use crepe or conforming bandages to bandage the entire bitten limb from the top to the bottom. (Don’t apply a pressure bandage if it was another species or the culprit is unknown.)
- Splint the entire limb to prevent movement.
- Keep the patient still so that their heart rate does not increase, as this may spread the venom around the body. Do not let the patient walk around.
- Call for emergency services backup and try to get the patient to a hospital that has anti-venom in stock.
- Complete treatment by carrying out the secondary survey.
- Venom in the eyes can be rinsed out using saline or clean water.
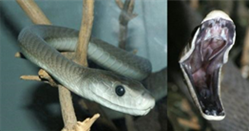
A puff adder (Our Herp Class, 2017) and a black mamba (Zhang, M., 2016).

POISONING
Poisoning is a condition or a process in which the body becomes chemically harmed (poisoned) by a toxic substance or venom of an animal.
Acute poisoning is exposure to a poison on one occasion or during a short period of time. Symptoms develop in close relation to the degree of exposure. Many common household medications and substances are not labelled with skull and crossbones, although they can cause acute, severe illness or even death. Acute poisoning is a very common accidental occurrence.
Chronic poisoning is long-term, repeated, or continuous exposure to a poison where symptoms do not occur immediately or after each exposure. The patient gradually becomes ill, or becomes ill after a long, latent period. Chronic poisoning most commonly occurs following exposure to poisons that accumulate over time, such as mercury or lead.
The four routes of entry through which poisons can enter the body are:
- Ingested: Ingestion of poisons is the most common form of poisoning and includes swallowing liquids, household chemical agents, contaminated food, plants, or drugs.
- Absorbed: Absorption occurs through the skin, straight into the blood stream. Local skin damage and burns also occur.
- Inhaled: The inhaled substance enters the blood stream through the lungs, where oxygenation normally takes place, and the effects of the poisoning are rapid.
- Injected: Poisoning by injection enters the blood stream immediately and is normally a result of drug abuse, such as heroin or cocaine.
SIGNS AND SYMPTOMS OF POISONING
Internal poisoning may not be immediately apparent. Symptoms such as vomiting are general, so an immediate poisoning diagnosis or confirmation cannot be made. One of the best indications of internal poisoning may be the presence of an open container of medication, or toxic household chemicals, or injection needles and syringes lying around.
Moderate poisoning symptoms, which are usually not life-threatening or permanent, may include the following:
- Blurred vision
- Confusion and disorientation
- Difficulty breathing
- Drooling
- Excessive tearing
- Fever
- Low blood pressure (hypotension)
- Loss of muscle control and muscle twitching
- Changes in skin colour and texture
SEVERE SYMPTOMS INCLUDE:
- Unconsciousness
- Convulsions
- Death
TREATMENT OF POISONING
With any type of poisoning, call the emergency services or poison control centre for backup and advice. Depending on the type of poison, the poison control centre may suggest additional first aid measures pending the arrival of emergency services. Ensure that it is safe to approach the patient and that you are wearing protective clothing. Continue with the primary survey.
- Absorbed: When dealing with absorbed poison, the poison should be removed carefully. Failure to do so may lead to you succumbing to the poison as well. Wear at least one—and possibly two—sets of gloves. Filter masks should also be worn to prevent inhalation. Poisons tend to be in either a powder or liquid form. The treatment for either form is the same. First, remove any excess poison from the affected area, by brushing or rinsing, or by removing clothing. Be careful not to inhale or touch the poison. If possible, capture the poison in a clean, secure container for identification purposes. Next, irrigate the affected skin area for at least 20 minutes to dilute the poison.
- Inhaled: When treating inhaled poison, get the patient to fresh air. Use caution in administering rescue breathing to a person overcome by hazardous chemicals, as you may become contaminated.
- Ingested: Check the label for specific first aid instructions for that specific poison. These might include dilution with water or milk, administration of syrup of ipecac or activated charcoal, or the use of some other common household products as improvised emergency antidotes. Appropriate first aid measures vary depending on the type of poison. Induced vomiting may do more harm than good, because the poison may harm the alimentary canal or oesophagus. Vomit may also block the airway. However, induced vomiting may be necessary with some poisons in order to save the patient’s life.
- Injected: Injection poisoning can occur from a variety of sources, from drug abuse, to insect bites or stings, to animal bites. Poison Control Centres will provide the best information for first aiders. Basic treatment involves monitoring the patient’s primary survey, treating for shock, observing the patient for an allergic reaction, and keeping the patient calm.
SECTION 7: FIRST AID TREATMENT PROCEDURES FOR MEDICAL EMERGENCIES AND SHOCK MANAGEMENT.
HEART ATTACK
A heart attack in the pre-hospital environment is termed acute myocardial infarction (AMI). AMI occurs when blood flow to a part of the heart decreases or stops, causing damage and death to the heart tissue and muscle.
Most AMIs occur due to coronary artery disease. Risk factors include high blood pressure, smoking, diabetes, lack of exercise, obesity, high blood cholesterol, poor diet, and excessive alcohol intake, amongst others. The complete blockage of a coronary artery caused by a rupture or loosening of a piece of plaque is usually the underlying mechanism or cause of AMI. A heart attack happens when the supply of blood to the heart is suddenly blocked.
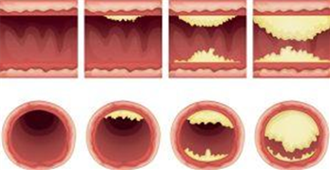
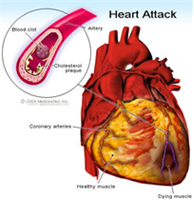
Atherosclerosis causes heart attacks (Andre, D., 2017) (Caren, JF. & Urman, MK., 2018).
Angina is also a heart condition and emergency, but is not as bad as acute myocardial infarction, as it is a partial (not complete) blockage of the heart’s vessels. People who have angina are more likely to have an AMI soon. Angina happens when the arteries to the heart become narrow and the heart muscle can’t get enough blood. This can happen when someone is doing a physical activity, but is even more of a concern if it occurs at rest.
Angina pain is usually a tight chest pain, which may ease if the patient rests straight away and takes angina medication, and may only last a few minutes. If the pain lasts longer, presume it’s a heart attack.
SIGNS AND SYMPTOMS OF A HEART ATTACK/AMI
- The most common symptom of acute myocardial infarction is pain. It is often described as a sensation of tightness, pressure, or squeezing in the chest.
- The pain radiates most often to the left arm, but may also radiate to the lower jaw, neck, right arm, back, and upper abdomen.
- The pain associated with a severe AMI does not change with position or rest, and lasts longer than 20 minutes.
- Chest pain is usually accompanied by sweating, nausea or vomiting, and fainting.
- Loss of consciousness due to inadequate blood flow to the brain and cardiogenic shock often occurs, and death may also follow.


Signs and symptoms of a heart attack (British Heart Foundation, ND) (Cleveland Clinic, 2018).
TREATMENT OF A HEART ATTACK/AMI
- Try to keep the patient calm. Becoming anxious or stressed will aggravate and worsen their condition. Talk calmly and let them know that help is on the way.
- Loosen any tight, restrictive clothing, such as ties, top buttons, jerseys, etc.
- Move the patient into the most comfortable position. The best position is on the floor, leaning against a wall, with the knees bent and the head and shoulders supported.
- Continue with the normal treatment procedure, but make sure that the emergency services have been contacted and are on their way, and that an AED is nearby, if you have one.
PRIMARY SURVEY TREATMENT
- Hazards
- Hello
- Help
- Circulation
- Airway
- Breathing
- Don’t delay – call for backup
SECONDARY SURVEY TREATMENT
- Vital signs
- SAMPLE history
- Head-to-toe examination
- Be aware that they may go into cardiogenic shock, which can be brought on by the heart attack.
- Keep checking their breathing, pulse, and level of consciousness (LOC).
- If the patient loses responsiveness at any point, open their airway, check their breathing, and prepare to treat someone who has become unresponsive. You may need to perform CPR.
STROKE / CEREBROVASCULAR ACCIDENT (CVA)
Stroke is a medical condition in which poor blood flow to the brain results in brain cell death. There are two main types of stroke: ischemic, due to lack of blood flow, and haemorrhagic, due to bleeding. They result in part of the brain being starved of oxygen, and brain cells and tissues not functioning properly. The medical term for a stroke is a cerebrovascular accident (CVA).
The main risk factor for stroke is high blood pressure. Other risk factors include smoking, obesity, high blood cholesterol, etc.

Stroke can be due to either ischaemia or a bleed (Mayhew, G., 2015) (Wedro, B., 2018).
SIGNS AND SYMPTOMS OF A STROKE
- Inability to move or feel the one side of the body.
- Difficulty understanding and speaking. Patient may have slurred speech.
- Drooping of one side of the face.
- Difficulty lifting one arm (one arm functions well and the other does not).
- Feeling like the world is spinning.
- Loss of vision in one eye or to one side.
- Severe Headache.
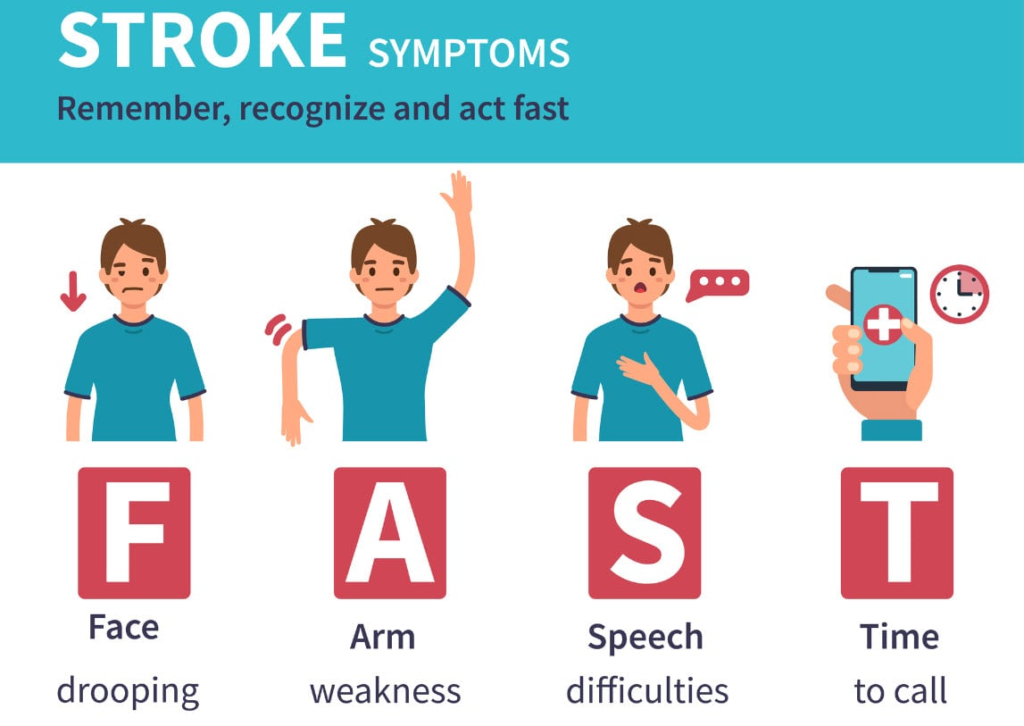
Think F.A.S.T (Vivian, M. 2018).
TREATMENT OF A STROKE
- Time: If any of the symptoms above are showing, time is of the essence; call the emergency services or go to a stroke unit or hospital ASAP.
- Patients may have a decreased level of consciousness, so pay attention to the primary survey.
- Place the patient in the lateral recovery position ASAP to protect their airway.
- Most stroke patients can hear and understand what is going on around them, so talk to the patient and comfort them. Tell them that help is on the way and that you are with them and will help them. Administer TLC (‘tender loving care’).
ASTHMA
Asthma is a common long-term inflammatory disease of the airways of the lungs. It is characterised by bronchospasm (spasm of the airways in the lungs), as well as swelling of the membranes in the lungs and increased mucus production in the airways and lungs. This leads to difficulty in breathing (dyspnoea). Asthma is a real emergency and many people stop breathing altogether and die from asthma.
Asthma episodes may occur a few times per day or a few times per week, depending on the person. The condition may become worse at night or with exercise.
Asthma is thought to be caused by a combination of genetic and environmental factors. Environmental factors include exposure to air pollution and allergens. Other potential triggers include emotional stress and medications such as aspirin. Asthma often begins in childhood and the rates of asthma have increased significantly over the years, possibly due to increased air pollution.
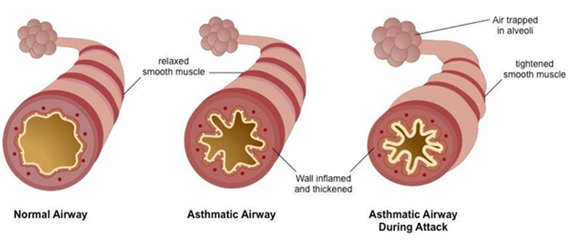
SIGNS AND SYMPTOMS OF ASTHMA
- Medical history of asthma and the use of an asthma pump.
- Wheezing: a whistling sound when the patient exhales.
- Coughing and excessive mucus production, which is difficult to bring up.
- Chest tightness and shortness of breath.
- Cyanosis: a bluish discoloration due to a lack of oxygen in the blood stream.
- Starved of air (air hunger), trying to forcefully breathe in air.
- Symptoms are usually worse at night and in the early morning, or in response to exercise or cold air.
TREATMENT OF ASTHMA
- The patient will be sitting in an upright position; keep them in this position.
- Their primary survey will be O.K., as they are awake/conscious and struggling to breathe.
- Loosen any tight or restrictive clothing over the chest and neck area.
- Try to calm the patient down and let them know that help is on the way.
- Make sure that the emergency services are on the way.
- As a first aider, you may assist the patient with using their asthma pump.
- Don’t overcrowd the patient. Keep bystanders away, unless they are immediate family.
DIABETES
Diabetes mellitus, commonly referred to as diabetes, is a group of metabolic disorders in which there are high blood sugar levels over a prolonged period of time.
If left untreated, diabetes can cause many complications, and even death. Serious long-term complications include cardiovascular disease, stroke, chronic kidney disease, foot ulcers, and damage to the eyes. Diabetes is due to either the pancreas not producing enough insulin or the cells of the body not responding properly to the insulin produced. Diabetes at least doubles a person’s risk of early death.
SIGNS AND SYMPTOMS OF DIABETES
Symptoms may develop rapidly, over weeks or months, but usually develop much more slowly, over many months or years. High blood sugar diabetes generally develops slowly and there is time to take the patient to hospital. Because of this, it’s not an immediate emergency.
SIGNS AND SYMPTOMS OF HIGH BLOOD SUGAR
- Hot, red, and dry skin (important sign).
- Fruity breath odour that smells like apples.
- Blood sugar testing machine has a high reading.
- Frequent urination.
- Increased thirst.
- Increased hunger.
- Blurry vision.
- Headache.
- Fatigue.
Diabetic patients may also develop low blood sugar levels. When patients take their diabetic medications and forget to eat proper meals, their sugar levels drop rapidly. Low blood sugar is common and, in most cases, not considered a medical emergency. However, if the patient’s blood sugar levels fall quickly, this becomes a serious emergency, as the brain needs sugar to survive.
SIGNS AND SYMPTOMS OF LOW BLOOD SUGAR
- Cold and clammy skin (important sign).
- Feeling of unease.
- Sweating.
- Trembling.
- Increased appetite.
- Confusion.
- Changes in behaviour, such as becoming aggressive.
- Seizures.
- Unconsciousness.
- Permanent brain damage or death in severe cases.
TREATMENT OF DIABETES
- When treating high blood sugar levels (hyperglycaemia), which is normally not an acute or immediate emergency, the patient needs to be transported to hospital for medication. Follow the usual primary and secondary survey procedures and call the emergency services if the case is severe.
- Low blood sugar levels (hypoglycaemia) may be a real emergency situation, depending on how low the patient’s sugar levels are.
- The patient may be unconscious, so pay careful attention to the primary survey.
- Place the patient into the lateral recovery position to keep their airway open.
- If the patient is still conscious, and if the symptoms indicate low blood sugar, give them sugar water to drink, or any fluid or food high in sugar.
- If they are unconscious, don’t administer anything, as that may lead to the patient choking on the substance administered.
When taking the patient’s medical history, you will probably find out that they are diabetic.
EPILEPSY
Although seizures are often thought of as dramatic events, there are a number of different types of seizures, some of which are much more subtle and difficult for an outsider to notice. A generalized seizure (Also known as a grand mal seizure, fit or convulsion) generally causes an acute decrease in state of consciousness, repeated movements of the body, excessive salivation, vomiting and often a loss of bladder and bowel control. This event may last from 30 seconds to a few minutes.
The other main type of seizure is a focal motor seizure which is a much less dramatic occurrence. A focal motor seizure will cause just a repeated twitching movement in either the face or limbs and usually only lasts a few seconds. Absence seizures (which used to be called Petit Mal seizures) usually involve a short period of impaired consciousness, often accompanied by a staring expression and sometimes mild twitching of small muscle groups.
A seizure may be preceded by warning signs known as an aura, this may include unusual sensations, smells or tastes. After a seizure, the individual may have a headache, sore muscles, experience unusual sensations, feel confused and tired. These after effects of a seizure are called the postictal state.
Seizures are caused by an abnormal electrical activity in the brain
COMMON CAUSES OF SEIZURES
- Trauma
- Birth
- Tumours
- Scar tissue
- Inflammation / infection
- Genetic
- Hyper/hypothermia
- Hypoglycaemia
- Repetitive flashing light
- Hypoxia
GRAND MAL SEIZURE
This is your typical violent seizure with stages of aura/ tonic / clonic / post-ictal
AURA: Patient may scream and then fall to the ground
TONIC: Patients muscles are stiff for about 30 seconds
CLONIC: Patients muscles are contracting and relaxing for a period of time
POST-ICTAL : Patient either sleeps or gets aggressive
TREATMENT FOR A PATIENT WHO IS HAVING A SEIZURE
- Don’t restrain the patient
- Remove any objects from around the patient so that they can’t hurt themselves
- If possible, support the head so that they don’t bang their head on the floor
- Don’t put anything into the patient mouth
- Let the patient finish their seizure
- Once the patient has finished their seizure, turn them onto their side
- Monitor the patient’s vital signs
- Call for assistance as soon as possible
- Get a full history of the patient (sugar, drugs, etc.)
STATUS EPILEPTICUS
Status Epilepticus is when the patient has a seizure for longer than 15 minutes. During the 15-minute period the patient is not breathing sufficiently to sustain life, and if the patient is left untreated, the patient will die.
SEIZURES IN CHILDREN
All the factors that play a part in adults are also is effective in children. A rise in body temp however causes the child to start to fit much quicker.
SIGNS AND SYMPTOMS OF SEIZURES IN CHILDREN
- Uncontrolled jerking action
- Breathing is impaired
- Not reacting to voice (verbal commands)
- Some children have a fit in the sense that they have a fluttering eyelid and a glare and are completely unaware of their surroundings.
TREATMENT FOR A CHILD HAVING A SEIZURE
The treatment for a child having a seizure is identical to that of an adult but may also be sponged down to try and break their fever. (If the seizures are as a result of a high temperature)
6. SHOCK
Shock is often referred to as circulatory shock and is a life-threatening emergency condition of low blood flow and low oxygen delivery to the body’s cells and tissues.
Circulatory shock is not related to the emotional state of shock; there is a difference and the two conditions must be separated.
Circulatory shock is a life-threatening medical emergency and one of the most common causes of death for critically ill people. Shock can have a variety of effects, all with similar outcomes, but all relate to a problem with the body’s circulatory system.
There are four types of shock:
- Hypovolemic shock
- Cardiogenic shock
- Neurogenic shock
- Anaphylactic shock
HYPOVOLEMIC SHOCK
Hypovolemic shock is the most common type of shock and is caused by insufficient circulating volume. Its primary cause is haemorrhage/bleeding (internal or external), or loss of fluid from the circulation system. Vomiting and diarrhoea are the most common causes in children. Other causes include burns, environmental exposure/excessive exercise, and no fluid/water intake.
CARDIOGENIC SHOCK
Cardiogenic shock is caused by the failure of the heart to pump effectively. This can be due to damage to the heart muscle, most often from a large heart attack/myocardial infarction. The pump (heart) can’t pump effectively.
NEUROGENIC SHOCK
Neurogenic shock is shock resulting in low blood pressure caused by disruption/damage of the nervous system within the spinal cord. The damage to the spinal cord is mostly caused by trauma (bullets, accidents, falls, assaults, etc.) and results in the circulatory system/blood vessels dilating and the pooling of blood.
ANAPHYLACTIC SHOCK
Anaphylactic shock is caused by a severe anaphylactic reaction to a certain substance, causing the widespread leaking of fluid out of the vessels in the circulatory system. People are allergic to different substances, such as peanuts, bees, shellfish, and certain medications, which may cause a local reaction or a systemic reaction called anaphylactic reaction, leading to shock.
SIGNS AND SYMPTOMS OF SHOCK
- Fast heart rate (early stage)
- Sweating and cold skin
- Dry mouth
- Aggressive behaviour
- Confusion
- Nausea and vomiting
- Slow heart rate (late stage)
- Loss of consciousness
- Seizures/fits
- Death
TREATMENT OF SHOCK
How severe the patient’s shocked condition is (early stage or late stage) will determine how they present or what signs and symptoms they may present with. They may be conscious and sweating, or unconscious and having convulsions.
- Follow the normal treatment process of the primary and secondary survey.
- Remember safety.
- Primary survey: the patient may be unconscious or aggressive. Monitor their airway, but don’t restrain the patient.
- Place the patient in the lateral recovery position, or keep them lying flat/horizontal if possible.
- Make sure that the emergency services are on their way.
- Secondary survey: try determining why the patient is in shock.
- Keep the patient warm by covering them with a blanket.
- Monitor and record the patient’s heart rate and other vital signs to see if they have changes in values.
6. FAINTING
Fainting (or Syncope) is a sudden and brief loss of unconsciousness due to a temporary decrease in supply of oxygenated blood to the brain. Often patients recover within a few minutes.
Fainting could be due to a variety of issues such as:
- Low blood pressure
- Anaemia
- Low blood sugar
- Seizures
Treatment includes:
- Primary Survey
- Secondary survey
- Recovery position
SECTION 8: TRIAGE, RECORD KEEPING AND EMERGENCY CARRY METHODS.
TRIAGE
A mass casualty incident is when there are numerous patients injured that will need medical attention. If we take an example of two minibus taxis colliding which is a common occurrence in South Africa, we can expect anything from 20 and up patients that will need to be treated. No one is super human and be able to treat all of those patients at once. It is for this reason that a triage system was designed to decide who to treat first and save the maximum amount of lives with limited resources. People with life threatening injuries will receive treatment and transportation first. Once you have triaged the patients, they have to be marked so that everyone can identify which patients are in dire need of assistance and which ones can wait a little for treatment. Marking the patients can range from writing on the hands to hanging triage cards around their necks.
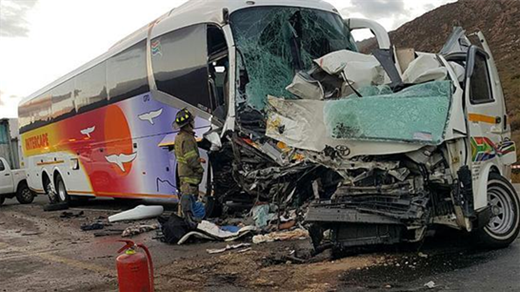
A mass casualty incident involving a bus and a taxi (Daily Voice, 2017).
APPLYING TRIAGE
The first time a first aider encounters a mass casualty scene, he or she might be overwhelmed by the shear chaos that is unfolding in front of them. There will be crying and screaming from patients, bystanders who keeps calling for assistance, traffic officers and other services demanding updates and answers all while you might be the only person on scene able to assist twenty or thirty patients.
The first step would be to chase out any and all bystanders from the scene and close the scene off. Next, you should identify a safe area where you can tell all the injured patients with minor injuries to group together. Once this is done the remainder of the patients can be triaged according to the following system:
- Red code / P1 – Patient with life threatening injuries, first aid intervention is critical
- Yellow code / P2 – Serious but not life threatening, if left untreated the patient might turn into a P1
- Green code / P3 – “Walking injured”, the patients have minor injuries and are attended to after P1 & P2 patients on a mass casualty incident
- Blue code / P4 – These patients have passed away / deceased
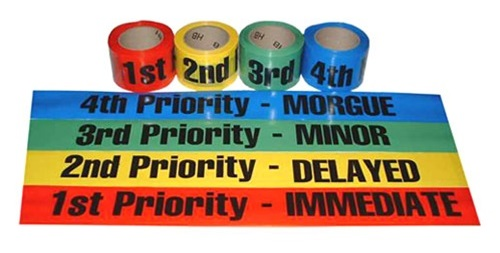
Triage tape (Sunset Survival & First Aid, 2018).
Once this has been done the P1 patients would receive treatment first and be transported after which the P2 patients would receive patients and then the P3 patients.
REPORTING AND RECORDING
After the incident has been completed and cleared, it is important to record and document the event and what took place during the incident or accident.
The sooner this can be completed, the more information can be remembered and recorded. It may be necessary to attend a legal or formal enquiry, years after the incident, where you are asked to explain or detail what took place on scene.
There are many standard ‘Patient Report Form’ templates available to use, which will guide you in ensuring that sufficient information is recorded, such as:
- What the scene looked like when you arrived;
- What took place on the scene;
- Who provided what treatment on-scene;
- How the patient responded to treatment;
- What happened to the patient’s personal valuables and belongings;
- Who took over from you at the scene;
- Anything that was unusual about the scene etc.
It is recommended that records of incidents and accidents are retained and stored for at least five years. However, if the incident was unusual or severe in nature, keep the record for 10 years.
EMERGENCY CARRY METHODS
You will not always have the luxury of carrying a patient on a stretcher or having the patient walk to a vehicle or ambulance. At some stage you will have to improvise to get a patient to safety. In this chapter we will discuss various methods in which a patient can be carried safely.
ONE-RESCUER CARRY TECHNIQUES
The ankle pull
The ankle pull is exactly as it sounds. The rescuer pulls the victim by the ankles to safety. This method is only suitable for short distances on a smooth surface as the risk of abrasion is very high. When pulling a patient in this method remember to keep your back straight so as to not injure yourself. Also keep in mind that the patient’s head is not supported so may bounce over obstacles on the ground.

The shoulder pull
The victim is grasped underneath the shoulders, slightly lifted and then dragged backwards. There is a danger of the rescuer injuring his/her back from and pulling the weight. This method is easier on the patient, though, as the head is supported and large abrasions to the back are avoided.

The blanket pull
Place the patient on a blanket using the logroll method. Once the patient is lying centrally on the blanket or sheet you can proceed to drag them backwards. Remember to use your legs and not your back to pull the patient.
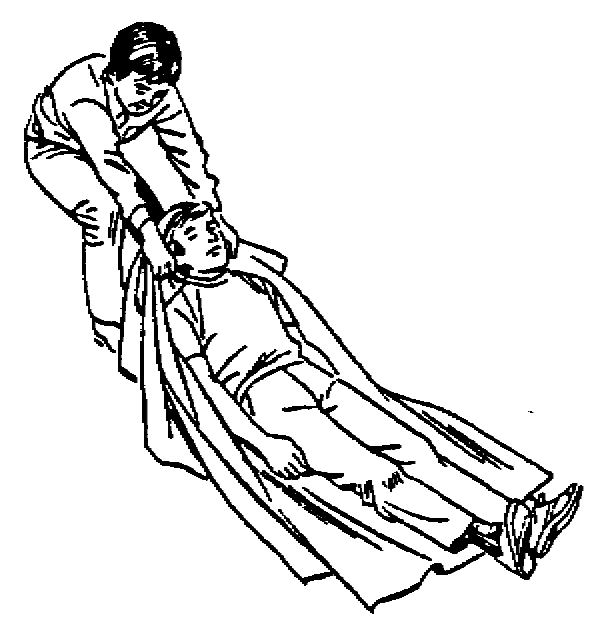
One-person lift
This method is only suitable for carrying a child or lightweight adult, as the rescuer will injure him/herself and possibly the patient if the patient is too heavy. Place one arm around the patient’s knees and your other arm around their backs and pick them up.
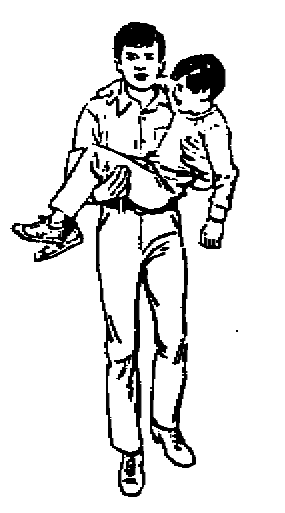
Fireman carry
In this carry the patient is carried over one shoulder of the rescuer. This is good for when a patient needs to be carried for a long distance – but getting the patient onto one’s shoulder is a difficult task. The rescuer must be very strong or have an assistant to get the patient into the correct position.

Pack-strap carry
When injuries don’t allow the fireman carry you may want to try the pack-strap carry. Here the rescuer bends their knees slightly while the patient puts their arms over the rescuer’s shoulders. Cross their arms and grab him/her by the wrists. Now straighten your legs, lifting the patient off the ground. This method is also suitable for long-distance carrying. (Clippinger, S., 2005)
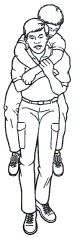
TWO-RESCUER CARRY TECHNIQUES
Human crutch
If the patient is conscious have him/her place one arm around each rescuer. From here the patient can partly support him/herself using the rescuers like crutches. Lift an unconscious patient off the ground and place one of their arms around each rescuer; if the patient is heavy each rescuer can place an arm around the patient’s waist to assist the lift.
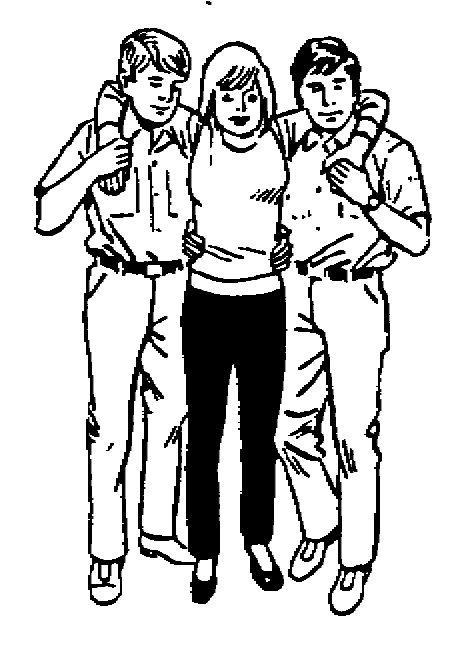
The four-handed seat
This method is used for moderate distances. The patient must be conscious as he/she has to stay upright while being carried. Position the hands between the two rescuers as illustrated and lower yourselves by bending your knees. The patient can now sit on your arms like a chair. Lift the patient again, using your knees.

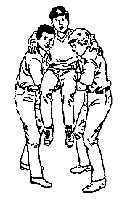
The two-handed seat
This technique works well for unconscious patients who must be carried over a long distance. Both rescuers kneel next to the patient, grabbing each other’s arms beneath the patient’s shoulders and knees. Lift the patient from here.

The chair carry
The chair carry is extremely effective when a patient has to be carried over an uneven surface or up or down a flight of stairs. Use a sturdy solid chair without wheels or one that is made of aluminium. Seat the victim on the chair. One rescuer holds the back of the chair while the second rescuer holds the chair by the bottom of the front legs. The patient is tilted backwards and then lifted.
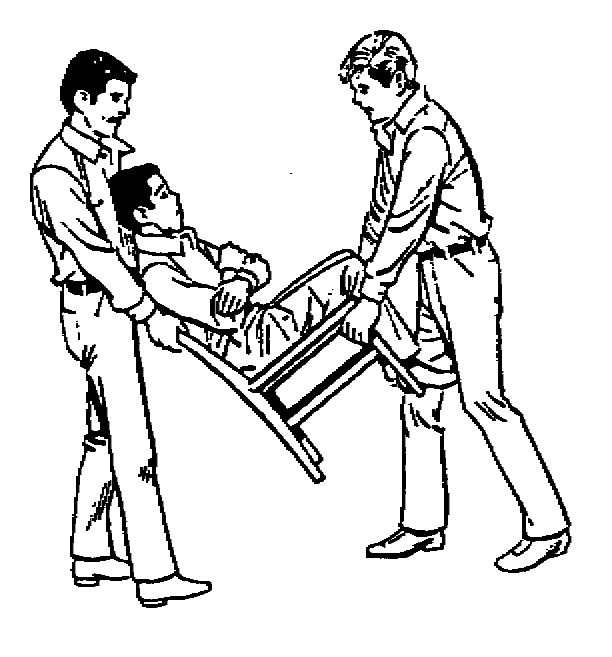
The improvised stretcher
Sometimes it will not be possible to carry a patient, e.g. if they are suffering from a spinal injury. In this case you may have to use a makeshift stretcher to carry the patient. Find two poles strong enough to bear the weight of your patient. Rescuer one takes an end of each pole, one in each hand, while rescuer two pulls rescuer one’s shirt over their back and onto the poles. Repeat this process with rescuer two adding their shirt to the stretcher. This should be strong enough for the patient to be log rolled onto the stretcher.

The blanket stretcher
If it is not practical to take your shirt off to make a stretcher you can also use a blanket to make a stretcher. Place a pole on the blanket about 30cm from the end. Fold the shorter piece of blanket over the pole. Place a second pole about 60cm from the first pole and fold the blanket around this pole. Pull the blanket underneath and around pole one and over again (follow the illustration). The patient’s weight will keep the blanket from unwrapping.

THREE OR MORE RESCUER CARRY TECHNIQUES
The hammock carry
Numerous rescuers align themselves on opposite sides of the patient and grab each other’s arms underneath the patient. The patient may be lifted safely when everyone’s arms are locked.

The stretcher lift
Each rescuer kneels next to the patient and places their arms underneath him/her. On instruction from the rescuer closest to the head the patient is lifted onto the rescuers’ knees. When this has been done the rescuer at the head gives the next instruction and everyone stands. This method is used when a patient has to be picked off the floor and placed on a bed or stretcher.

All images in this module are from Cert-LA (no date) unless otherwise indicated.
ATTACHMENT A
The complete patient simulation
The following is just a quick guide which should be followed when treating a patient from approaching the patient until handing the patient over.
- Hazards – Ensure that the scene is safe to approach and that relevant scene safety has taken place. Also ensure that your personal safety has been taken care of wearing the appropriate PPE
- Hello – Attempt to make contact with the patient to get a rough idea of the condition of your patient
- Help – Call for back where necessary. This may range from more muscle to help carry the patient to getting a helicopter landed on scene for an emergency airlift
- Circulation – Check if a pulse is present. If not start the CPR protocol. If a pulse is present check for any life-threatening bleeding. If major bleeding is present control it immediately.
- Airway – Is the patient talking to you? If he is then he is able to protect his own airway. If not open the airway using either a head-tilt-chin-lift or a jaw thrust depending on possible injuries sustained.
- Breathing – If your patient is awake and not complaining of any breathing problems you may skip this step. If the patient is unconscious however look, listen and feel for 10 seconds to make sure that the patient is in fact breathing. If no breathing is present continue with rescue breathing
- Vital signs – check the pulse for rate, rhythm and depth. Check the breathing for rate, rhythm and depth. Check pupil reaction. Check skin colour and condition. Check capillary refill.
- SAMPLE history – Where possible collect info regarding the SAMPLE history in order to give you a better idea of the patient’s condition
- Full head to toe survey – This is very important in trauma patients in order to find any fractures, lacerations, bleeding etc. Treat as you identify
- Call for back-up – If it wasn’t necessary to call for back up in the beginning it doesn’t mean that you won’t need assistance as time goes on. If you find a problem that you cannot deal with do not be afraid to call
- Transport – Once you have stabilised the patient the patient will need to be transported, wait for an ambulance to come and take the patient over from you.
- Re-evaluation – remember to re-evaluate the patient’s vital signs every 15 minutes to ensure that your patient is still stable.
- Record – Document and record all treatments, vital signs, history and whatever information you feel is necessary. It will help the hospital once the patient arrives. You may also end up in court and then at least you have your documentation to prove what you say is what happened.
- Handover – Hand the patient over sharing all the necessary information with the person you are handing the patient over to.
ATTACHMENT B
Legal required content of a first aid box
| FIRST-AID BOX INVENTORY CONTROL / MONTHLY CHECKLIST | |||||
| Regulation 3 / 7 of the General Safety Regulations | |||||
| Minimum Contents of a First-Aid Box | |||||
| No. | Item | Qty | Date checked | Date of next check | Date replaced |
| 1 | Wound cleaner / antiseptic (100 ml) | ||||
| 2 | Swabs for cleaning wounds (50) | ||||
| 3 | Cotton wool for padding (100 g) | ||||
| 4 | Sterile gauze (minimum quantity 10) | ||||
| 5 | 1 Pair of forceps (for splinters) | ||||
| 6 | 1 Pair of scissors (minimum size 100 mm) | ||||
| 7 | 1 set of safety pins | ||||
| 8 | 4 Triangular bandages | ||||
| 9 | 4 Roller bandages (75 mm x 5 m) | ||||
| 10 | 4 Roller bandages (100 mm x 5 m) | ||||
| 11 | 1 Roll of elastic adhesive (25 mm x 3 m) | ||||
| 12 | 1 Non-allergenic adhesive strip (25 mm x 3 m) | ||||
| 13 | 1 Packet of adhesive dressing strips (minimum quantity, 10 assorted sizes) | ||||
| 14 | 4 First aid dressings (75 mm x 100 mm) | ||||
| 15 | 4 First aid dressings (150 mm x 200 mm) | ||||
| 16 | 2 Straight splints | ||||
| 17 | 2 Pairs large & 2 pairs medium disposable gloves | ||||
| 18 | 2 CPR Mouth pieces or similar devices | ||||
| 19 | Blood spill kit |